Showing posts with label directions. Show all posts

Tuesday, June 7, 2011

Stomp Wedding Dress

Note: I have updated the links to the pictures, so hopefully they work this time.


I have just been going back through my old blog posts, trying to find a specific post, the post where I talk about the Stomp costume I made last October for the Halloween murder on the dance floor stomp. And while I can find blog posts about many of the things I did for the costume, I couldn’t find any posts specifically about the costume.
Although, as I think about it, the reason I didn’t put a post on my blog because I put a fairly detailed post on crafster.
Please note, this is a very long, very picture heavy post.
So, here is a copy of what I put up on craftster: Post 1 and Post 2.
For a upcoming dance event, I am creating a gibbous-inspired dress. The event is in just under two weeks now, so I really have to get my act together.

The theme for this event is 'Halloween: Murder on the Dance Floor'. I had originally planned to go as the Corpse Bride from Tim Burton's film, but while researching how other people had done it, I stumbled across Cassadee's leaf dress:


This made me totally rethink what I was doing. So, I decided to do my own gibbous inspired dress. And, yesterday, I figured that there was a sew-along, so I thought I would post my progress here.

Because the gibbous dress is not something that I originally set out to do, there is a decent amount of new stuff in my dress, but also stash items and thrifted things.

So, the materials I have used so far (or plan to use):
  • New Curtain Lace
  • New Lilac/Mauve Muslin
  • Old curtain lace from stash
  • fabric straps from stash
  • lace from stash
  • New invisible zip
  • grommets from stash
  • new and stash ribbon
  • new lace
  • lots of thrifted lace diolies
  • beads and buttons from my mother's stash
  • 2 thrifted baby dresses, wanted for their embelishments
  • young girl's jeans, adorned with lace (removed to use)
  • teen girl's lace skirt, taken apart to remove lace

So, armed with these items, and with the pictures I had printed as inspiration, I started my dress.

Firstly, I neurotically photographed ever lace doilie, and piece of lace I planned to use. A little OCD perhaps, but I wanted the record.

Some of my favourites:


I gave myself a few rules when I started this dress
1) NO BLACK
2) Must be able to dance in it
3) My bra and underwear must NOT be visible
4) It must have a butterfly somewhere (what a score the lace doilies with the butterflies were)

Going along with the bride theme, the first thing I did was to create a veil. I think I originally read the instructions for the veil on instructibles, but as I didn't write down, copy or book mark the link, I'm not totally sure.

The veil was really easy. I took a rectangle of my curtain lace (because it's for curtains, it had a 2 m drop or width), removed the scalloped hem and the curtain tape, and then folded in in half vertically in horizontally. I then cut a curve in the bottom, from the folded edge to the raw edge.


After unfolding, I bound the edge with silver bias binding. I sewed it in place using a wide, short zig zag stitch, and invisible thread.

Next, I folded it in half, with the under side longer than the top. I gathered along the fold line, and hot glue gunned it onto a slide comb.

And, ta dah! one veil.


I also blogged about parts of the dress here:
flower fabric texture; veil; miniature poison vials and shrug.

Next, I started on the dress.

I started with a simple strapless dress pattern:


I wanted a bustle, so using two layers of stiff tulle, (or nylon net, depending on where you are), one layer of curtain lace, with the edges bound to match the veil, and one layer of muslin on top. The final bustle is three layers, each about 5cm longer than the last.

My bustle pattern is fairly easy. It is basically two curves, a straight line cut on the fold.


With each subsequent layer, I made the lower curve dip about 5cm further. The curved upper allows the bustle to poof up.


Because the base of my dress is muslin, I wasn't sure how strong it would be if I sewed the bustles directly onto the dress. So, I sewed on three strips of cotton tape to give a bit of strength. Each is 5cm lower than the next, and the top one is 5m lower than the waistline (I made the lowest bustle sit under my waist because the dance style often requires your partner to run his hand along your waist, and if there is too much detailing on the waist, it tends to get caught).


I am planning to put eyelets in the back, and have the dress lace up. Again, I am concerned about the strenght of the dress. So, I added cotton tape where the eyelets will sit, as well as along the under bust line, and the waistline (not shown) and the top of the dress (not shown). these bands of cotton tape that go around my body will have press studs attached to them to behind the zip, to allow the tension to be shared around the dress, and to reduce tension on the zip.


I edged each of the muslin bustle pieces with lace, or the lace borders from my doilies. I don't have a before photo, but it really made each bustle layer 'pop'.


Next I added detailing to the top layer of the bustle.


This puffyness is actually around a butterfly shape. I really wasn't happy with this detail, so I unpicked it, and am now experimenting with this bustle design.


It isn't sitting right yet, so I think I am going to cut another layer of muslin, construct it flat, and then add it on top of my current bustles.

I have just started the detailing on the main part of the dress. So far, I have stitched the detailing on the right hip side of dress.


The dress became almost entirely covered in texture, with a few exceptions where I left the curtain lace on display, because, lets face it, it’s pretty.

In the last post, I had sewed the detailing on the right hip, and was starting to redo the bustle detailing. I started with another piece of the bustle, laying it out flat, and pinning the detailing in place. Not only did this solve the problem I was having with symmetry, it also allowed me to add more butterflies.

And, as a side note, I went back to get more lace doilies, because I thought I was going to run out, and found the two big butterflies that are in the centre of the lowest row. They’re stitched by the same hand as the other butterflies on the dress. I (think) I probably gained all of this amazing woman’s work that was in the local op shop. It’s really precise and detailed, and made my dress look awesome


After this, I put the eyelets into the back lacing, and where the straps would go. It’s been a while since I last did anything with eyelets. Normally when I make corsets, I will use loops instead. They are just easier. And, doing this dress, I realised why it was that I avoided eyelets. I’m really, terribly bad at putting them in. I managed to put them in so that only one of the eyelets came out, but they were all smooshed and misshapen. Next time, I would definitely be using loops again.

I cut out the middle back section, so that the lacing was clearly visible, and edged the seam with ruffles from the little girls dresses.

Next, I started working on the detailing for the bodice of the dress. I had fallen in love with a ‘flower’ texture, and had made tons (like, 10L, which I know is a strange measurement for anything sewn, but I filled 2 x 4L and 1 x 2L containers) of fabric flowers out of circles.

I have posted a tutorial of how I did this texture on my blog
http://sewingsoffyrefairee.blogspot.com/2010/10/fabric-flower-texture.html. It’s time consuming, but I was really, really pleased with the result.


The only thing I would do differently would be to have the gold at the top go further down the bodice – I just love the look of it!

As you can see in the first photo, the right side of the bodice is covered with the flower texture, but the left side is bare. I had originally planned to cover both sides with the flowers, but I ran out (or close enough), so wasn’t going to be able to. Leaving the left side blank was also not an option, because (a) it meant that my bra was visible, breaking one of the rule I had set for myself, and (b) it made the dress look unbalanced.

So, I added rows of lace. The top few rows are scalloped, following a scalloped line in the lace. As I got further down the bodice, the line straightened out. 

Next, I continued with the detailing. The front of the bodice was now fully covered, so it was just my knickers that I had to worry about covering. I spent, well, hours pinning detailing onto the dress, staring at it, unpinning it, until I was happy with the detailing.

For the detailing on the left hip, I used the embroidered design from one of my little girl’s dresses. The surrounding lace is from another doily, the rows of fabric are scraps from my stash that I folded in thirds and sewed down, and the purple leaves are from a fabric in my stash. The buttons are from my mother’s stash.


I placed each of the cut out embroidered details on a flower from the curtain lace pattern. And, I had to laugh, half of the little embroidered designs had butterflies on them. I think that this part of the detailing has become my favourite part of the dress.

The back left got covered in lace, again with a combination of hand sewing and machine sewing.

The back right hand side I again used fabric scraps from my stash, and following the shape of the space, sewed this detailing. The buttons are from my mother’s stash.


Next, I sewed some buttons onto some of the lace on the front, and a row of buttons along the lace detailing on the left hip.


Lastly, I attached my ‘poison’ bottles to the row of buttons. 

And with that, my dress was finished!

(Although, the next day, I did sew myself a little shrug to wear with it)


As I was going to the dance party as a murderous bride, I had both the poison bottles above, and a ‘dagger’ letter opener (because I didn’t want to cut myself), worn on my leg with garter elastic.


(Please excuse the face I’m pulling in this photo – I don’t have my glasses on, so I tend to squint a bit)

And you know what? I really enjoyed this technique, so I think I’m going to be making more things along this line in the future.

Sunday, June 5, 2011

Wild West Dress for Stomp.

This is another refashion using Butterick 4443. I really should just draw up my own pieces (a sloper?), with my exact measurements, but until then, I’m going to keep using B4443.


This is my finished dress.


Again, my original inspiration is a modcloth dress.


Source


I’ve been wanting to do this dress for a while, and it just fits the theme, doesn’t it?

(I apologise for the quality of some of the photos. Almost all of my pattern alteration was done at night, so there was no natural light, and as my overhead light had blown, most of the light was from my desk light, supplemented with the flash. And, I'm still learning yo use my stylus.)

So, my pattern alteration.


I firstly thought through the steps I needed to take to alter this pattern. Please forgive my fairly bad drawing skills. The point was simply for me to think about the steps I needed to take to alter the pattern.
So that I could reduce the amount of time it actually took to alter the pattern. I also almost fully wrote out these instructions so that I would remember to photograph everything, and to think through the process of pattern alteration and construction.

The dress is essentially a wrap dress made from a woven fabric with piped neckline edging, a mid-waist button closure, 10cm midriff band, triple layered skirt and yoke.

So, the bodice alterations.
Mark all seam allowances on your bodice pieces.


Take your centre front piece. My pattern piece has a curved neckline, but for this dress, I want a V neckline. I want the V to cross lowish, about 5cm above my nipple line. High enough that I won’t be afraid of flashing the world each time I wear it, but low enough to be flattering (side note: I have a large bust, so V neck lines are very flattering, and although they draw the eye downwards, can have the effect of making the bust appear smaller. If the V stops above the nipple line. Any lower than the nipple line, and it tends to make my bust look huge. Which is good in certain situations, but not really what I’m going for here.) Your original pattern piece should have had a bust line marker. Usually, this is a circle with a cross on it. It tends to have the finished garment measurements near it. Extend this mark to the centre front seam, and mark a point 5cm higher.

Draw a straight line from the point where the neck and shoulder seams overlap to the mark you made above your bust. Using the point where the seams overlap at the shoulders will ensure that your shoulder seams overlap properly when you go to sew your altered pieces.

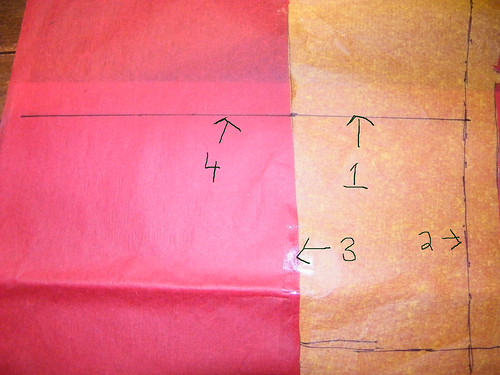
1. This is the bust marker for my garment.
2. The line I extended from the bust marker to the centre front seam
3.The point the shoulder and neckline seam join
4. Line drawn from the neck/shoulder seam and mark I made
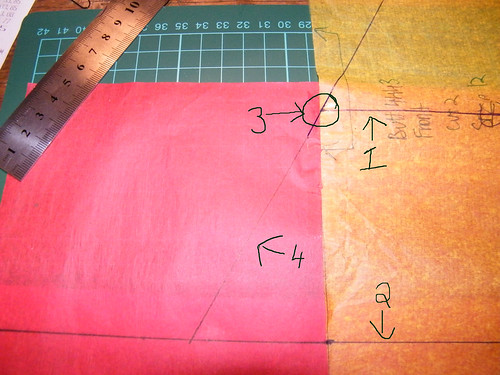
As I want the front midriff band to overlap, (rather than a zip, this is going to be my closure for the dress) I am going to extend the centre front piece. Start by marking 10cm up each of the seam lines from the waist, and joining the marks. Continue the both lines. This is going to be how we determine how much the overlap is. I drew a line about 13cm long.

1. Line drawn 10 cm from waist seam (midriff line).
2. Side front seam
3. Centre front seam
4. Continuation of midriff line, 13cm past centre front seam 
Next, continue the straight line from the neckline down until it meets our midriff band marker.

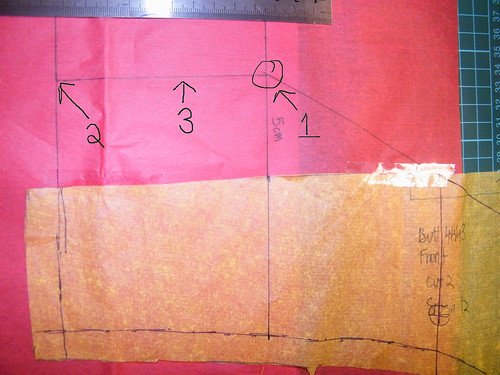
1. Bust line.
2. Midriff line.
3. Where the midriff line mets the neckline
4. Continuation of neckline.
From the point where our neckline and midriff line overlap, join the upper and lower midriff line, ensuring that you keep the midriff a consistent thickness – 10cm wide. Measure the distance from the original Centre front seam to the new centre front seam (which is no longer in the centre). Make a note of this. For me, it was 5cm.

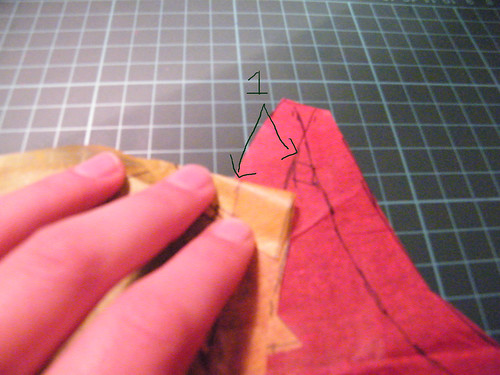
1. Where neckline meets midriff line
2. Waistline
3. This line is 10cm long

Next, we are going to create the midriff band pieces. I want the midriff band to be 10cm wide. So, I am going to mark 10cm from the waist seam along both seams on each of the centre front, side front, side back and centre back pieces. Cut along this line.

Arrows marking midriff line, drawn at 10cm from waistline
Cut along line, you will be left with 4 pieces that look like this

Laying the upper section aside, I am going to join the midriff pieces. Take your centre front and side front pieces and overlap them at the middle seam.

Line up the seams
Pieces taped together


Trace around this piece, adding the 1.5cm seam allowance on the top edge, and the centre edge. Mark this piece ‘midriff band front.’


Mark front and side on finished piece


Repeat for the back pieces. Label ‘midriff band back.’

Finished midriff band pieces

Take the measurement you noted down above (mine was 5cm, remember?) Double this. Take your front Midriff piece, and measure from the centre edge your measurement on the top and bottom seams, and mark. Join the marks. This is your placement line.

Add placket placement line
Trace this, adding a 1.5cm seam allowance to each side. This will be the placket, and will help to reinforce your button holes, and add the piping detail. Mark this piece ‘front placket.’

Placket

Next, we are going to created the yoke on the back. I want my yoke to hit the armscye in the middle (where the princess seam currently hits), and the curve to drop down 5cm lower at the centre back. So, taking the centre back piece, draw a line straight across from the princess seam to the centre back seam. Mark the point 5cm lower.

1. Where princess seam meets armscye
2. Line straight across to centre back seam
3. 5cm below straight line from armscye

Draw a curve between the two points. I used a French Curve to do this. I firstly drew a curve that sat below my line i drew from the armscye to the centre back, but I didn't like the look of it. So, I placed the French Curve so that the curve went above the line from the armscye to the centre back seam. This looked much better.

1. line the edge of the French curve up where the princess seam meats the armscye
2. line the French curve up with your mark
3. Make sure the French curve is above the line to centre back
4. My original line, below the line from centre back.  I didn't like this one.

Cut along this line, so you have a yoke piece and a centre back piece.

Back yoke and back piece


Trace around this piece, again adding the 1.5cm seam allowance at the base of the yoke. I also included the seam line, to transfer onto my fabric to ensure my yoke was even. Mark the centre back seam with a cut on fold symbol, and the pattern piece as ‘back yoke.’

Back yoke piece with seam line marked

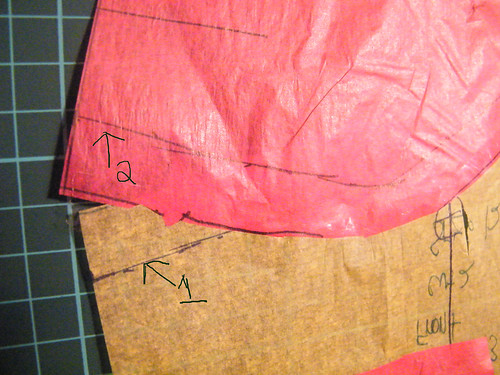
Now, take your centre back piece and side back piece. We are going to join these together, but because the seam line includes shaping, they won't join perfectly. I want gathers that sit under the yoke, and a smooth seam at the midriff. So, the gap left from overlapping the centre back and side back seam lines should be at the top.

1. The two seam lines don't line up perfectly
Seams that don't overlap perfectly. But that's okay.

Now, I’m going to add my gathers. I want use a 1.75 gather at the yoke. So, measure the top of the yoke. For me, this was 25cm. Using a calculator, times that measurement by .75. For me, this was 18.75cm. That is how much we are going to be adding to the top seam line.

Now, take your back piece, and mark 7 even lines.


1. Start your first line straight down from the armscye to the waist seam.
2. These pieces probably should not have been split, and left me with the weird puffy back growth.
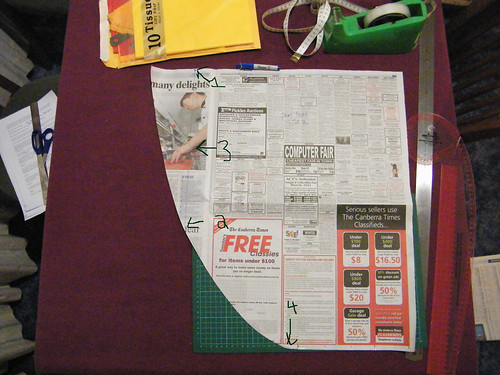
As we haven’t added a seam allowance at the bottom of our back piece, this is what we will need to line up. So they don’t move, I tape my pieces to newspaper (or as in this case) tissue paper when spreading them.

When I first did this, and I drew 7 even lines, and spread them. the problem with this was that I ended up with some ugly puffy gathers around the point of the yoke, which made me look like I had a weird growth coming out of my back. Not pretty.

(This is what I did the first time: Because there are 7 gaps, we need to divide the amount we are adding by 7. For me, this was 2.6 cm. Tape your first piece down at the top. Take the second piece, and hold the midriff band points next to each other. Line the top points up so that they are your calculated distance apart.

1. Keep midriff seam together.
2. This is my gather of 2.6cm
Tape down the rest of your pieces repeating the steps above.

1. Again, these should have been kept together)

When I redid this, I took my originally altered piece, and taped the first two and last two pieces together. This meant that the gathers were starting as the curve levelled out, and reduced the weird-back-growth- look.

I re-split the pieces, keeping the three centre pieces, and the two side pieces together.

This also left me with 5 gaps to use, not 7. So, I divided my 18.75 by 5, which gave me 3.7cm. Using the same technique as before, I made sure the lower seam line matched up, and added 3.7cm between each of the pieces.

Trace exactly around your pattern piece, then add the 1.5cm seam allowance to the bottom and top seams

Then, trace the pattern pieces, adding a 1.5cm seam allowance at top and bottom. I also drew the seam line along the gather to make placement easier when I get to sewing the dress.

Back piece with top seam allowance marked.

You’re now done with the back pieces (yay!). Time to move on to the front.


We have already removed our midriff band, so the next step is the front yoke.

Again, I want the front yoke to hit the armscye at the princess seam line.


So, take your centre front piece.  Draw a line from the princess seam at the armscye to the neckline.

Add caption


Cut along this line. You will now have a centre front, side front and top front piece.

Side front piece, centre front piece and tope (front yoke) piece.

Take the top front piece. We’re not quite finished with the front yoke yet. Mark the point along the lower edge halfway between the neckline and your line from the shoulder. Draw a line from this new point to the shoulder seam.


1. Line straight from shoulder seam to line.
2. Line from shoulder seam to half way between straight down line and neckline
Now take a coin, or a small round object. I used an Australian 20c piece, but a glue stick would probably work just as well (and be a bit more accessible to all you non-Australians). Trace around the edge of the coin at the neckline of the top front piece.

Place your coin so it touches you middle line and the lower line
Draw around your coin to add a curve

Now, trace around the front top piece, adding seam allowances at the neckline and midriff seam. I also mark the seam line of the neck/midriff, so that I know exactly where I will be sewing my curve. Mark this piece ‘front yoke.’

Finished front yoke piece with seam lines marked


Take your front pieces.

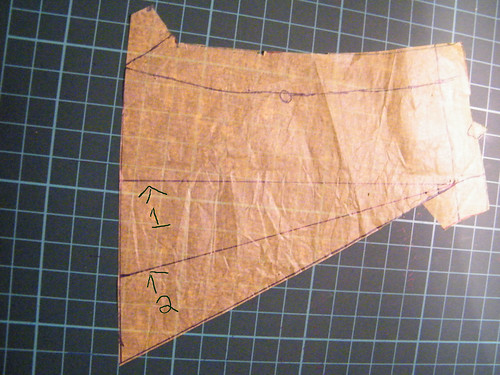
Line the seam lines up from the top. There will be a decent gap on the lower edge. This is okay, because we are going to be adding gathers.

1. Centre front seam
2. side front seam. 
They don't line up. That's okay

Front pieces with not-lining-up seams
I want to make both the yoke and midriff seam a 1.75cm gather.

Measure the top seam, and using your calculator, times the number by .75. For me, my measurement was 11cm, and after I timesed it by .75, my measurement was 8.25cm.

Do the same for the top measurement. For me, the measurement was 24cm, so my gather was 18cm.

We will be cutting the bodice piece into 6 pieces (5 cutting lines).

1. (upper edge) and 2. (lower edge) are not the same measurement.
To  add the gathers, you need to divide both of the measurements by 5. For me, I got 1.65cm (upper) and 3.6cm (lower). This is what I will be adding between each cut.

As with our back piece, I will tape the first piece down.

Now, this is slightly more tricky that the back piece, because you have to make sure the top and bottom measurements are correct before you tape the next one down.

1. lower gather amount, 3.6cm
2. upper gather amount, 1.65 cm
Trace around this, adding a 1.5cm seam allowance on the top and bottom edges. On the midriff seam, mark the seam line from the bodice side. This will be where you start the gathers. Mark this piece 'front.'

Front piece with seam lines marked.

Yay! That's all of the bodice piece alterations.

Next, we are going to alter the skirt.

I have an A-line skirt pattern, as well as a full pleated skirt pattern, but neither of those fitted what I was going for in this dress. I was after a more gathered look.

So, we will create totally new pieces. They will essentially be a big rectangle/tube thing.

First take your hip measurement. For me, this was 100cm Now, you could halve this to get the front and back measurement, and then double it (I want a 2 x gather for my skirt) to get the final measurement, but unless you are doing a different gather, you don’t really need to bother. Your waist measurement for the front or back piece will simply be your total hip measurement.

Next take the skirt length measurement. For me, this was the distance from my waist to knee, or 55cm.

Your back skirt piece is going to be a rectangle your total hip measurement by your skirt length measurement. If you halve the waist measurement, you will be able to make a smaller pattern piece, so long as you remember to cut it on the fold. Add 1.5cm seam allowances, and mark this piece ‘skirt back.’

Next is the skirt front. Like the midriff, it’s going to overlap. Go back and find your overlap measurement. For me, this was 10cm. You want to draw a rectangle that is half your hip measurement plus your overlap measurement. Make sure to mark the hip measurement. This is the centre front line. Along the hemline, mark the half way point. So, for me this was 50cm + 5cm = 55cm.

I want the split/overlap to finish 15cm above the knee/hemline. So, mark the point you want the skirts to overlap, from the hemline on my centre front line. Draw a curve from the waist to the overlap point.

Continue this curve down. I increased the curve angle a lot at this point, to the halfway point you marked on the hemline earlier. Try to keep the curve as smooth as possible.

1. centre front mark
2. Mark 15cm above hemline
3. Straight line from centre front to hemline
4. halfway between side seam and centre front
Now, lastly, we are going to make our sleeve altearations.

Take a sleeve pattern. It actually doesn't matter if it is a stretch pattern or not, because we are going to be adding puffy-ness to the sleeve, so it will fit in your armscye.

Sleeve pattern
Mark along the under-arm seam 7.5cm

Mark 7.5 cm from the arm seam on both of the inner arm seams. (I also marked 6cm).
Cut along this line.

Shortened sleeve pattern
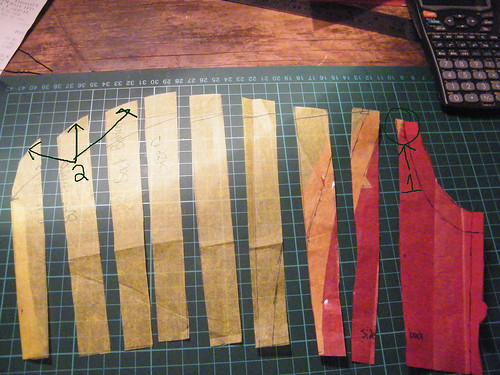
Draw 7 lines perpendicular to the hem line.

Line perpendicular to hem. I used the lines on my cutting mat to help me.
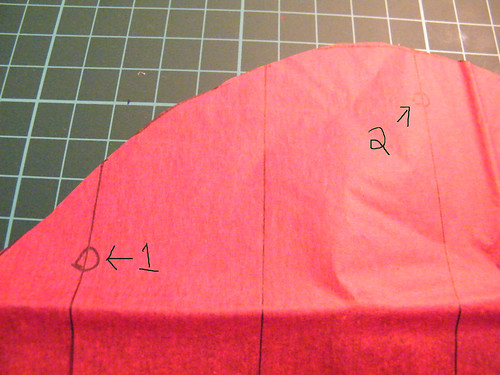
These should be as evenly spaced as possible, with the first and last being placed where the upper seam line starts to curve upwards. You should also try to ensure that one line goes through the centre dots, and the two placement dots.

Make sure your lines go through the dots.

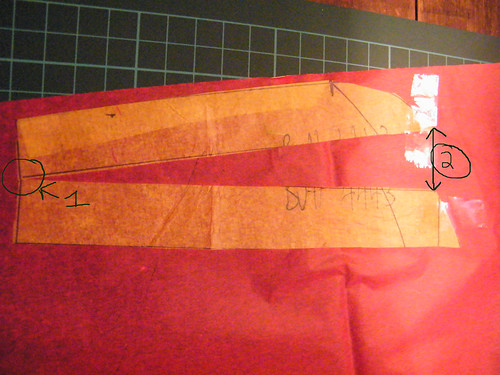
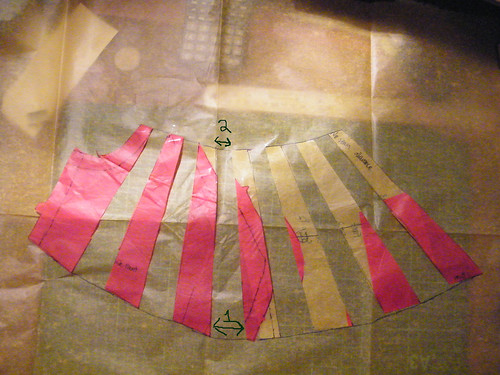
Cut along these lines and, like in the front piece, spread the pieces. You will spread these piece evenly. I put 2cm between each piece. The lower edge of the pieces should be kept on a straight line.


Spread our pieces, keeping the bottom edge consistent.

Using a french curve, draw a new curve for the sleeve.

Using a French Curve, redraw the sleeve cap

Trace over this, adding dots and notches to your final piece.

Mark dots and notches

Congratualtions! You've now finished the pattern alterations!

Now, it's time to sew the dress. I made this dress in a day, the day that I had to wear it. I finished it 5 minutes before I left the house, 1 hour after the event started. So, I didn't take any photos of my progress.

But, a basic summary is as follows:

You will need to cut the following pieces:

Main Fabric:
Front yoke x2
Front x2
Front Midriff x2
Front Plackett x 1
Back Yoke x1
Back x1
Back Midriff x1
Skirt Front x2
Skirt Back x2
Sleeves x2

Contrast Fabric 1:
Skirt Front x2
Skirt Back x2
Piping fabric.

Contrast Fabric 2:
Skirt Front x2
Skirt Back x2

Lining: (I used the main fabric)

Front yoke x2
Front x2
Front Midriff x2
Back Yoke x1
Back x1
Back Midriff x1

Because I used a checked fabric, I wanted to match checks wherever possible. A few of the places it was important to me were:

The back yoke / back / back midriff at the centre back seam. (Careful cutting)
The placket /front midriff. (Careful cutting)
The front yoke/ back yoke at the shoulders. (Joined the pieces, eliminating the shoulder seam)
The back and front midriff. (Joined the pieces, eliminating the side seam)

So, I cut each of these carefully, or joined the pattern pieces, to ensure that the details matched.

Construction:

*sew piping
* sew piping to lower edge back yoke
* sew back to back yoke
* sew shoulder seams of back and front yoke
* sew piping to front yoke around neckline
* sew front to front yoke
* set in sleeves
* lining: sew back to back yoke; shoulder seams of back and front yokel front to front yoke
* sew neck and armscye
* turn through
* topstitch along lower yoke edges
* decoratively top stitch back yoke
* sew side seams of bodice, midriff, skirts and contrast skirts
* sew piping on placket inner edge
* sew placket in place along placement line.
* sew piping to midriff band
* hem skirt
* sew skirt to front midriff band
* sew midriff band (front and back with bodice sandwiched in between) including edge of midriff.
* sew skirt to front pin inside midriff band in place. Hand stitch down.
* topstitch midriff band
* sew buttons, button holes