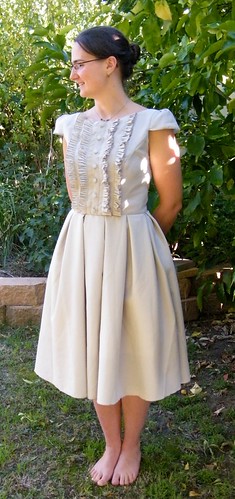
So, this is another modcloth inspired dress.
My finished dress:
The inspiration is here:
From that modcloth inspiration, I drew this as my guide to what I was sewing:
Drawing is clearly not my strong point. But it gave me the idea of what I was going to do.
This is actually a really simple alteration. It only required altering one pattern piece: Centre Front Bodice.
Again, like the olive dress, this pattern is based on Butterick 4443. As I’ve said before, it fits, I have made it a bunch of times, and it’s easy. So, once again, I went to my pattern box, and pulled out trusty B4443.
The skirt had already been altered from the original skirt (as seen in the purple crepe dress) to the pleated skirt in the tea-with-the-debutants dress (both can be seen in my post
here)
So, all I needed was the ruffle detailing.
I wanted 4 rows of ruffles and one row of buttons.
So taking my centre front piece:
I drew a line parallel to the centre front. This would be where my first row of ruffles sits.
The second row I angled slightly. I did this because I’m not rectangular, and the second, angled row of ruffles followed the princess seam a touch closer this way.
You can see a little mark between the lines at the neck. This is where the second line would have gone if they were evenly spaced, not angled.
I cut the pattern piece out, and cut along my lines
Cutting along each of my lines, I retraced these three pieces, adding a 1.5cm seam allowance. The marks are the 1.5cm seam allowance
And with that, you’re done with the pattern alteration.
I then started on my ruffles. The first (and fairly bad) try was using doubled over fabric and pin tucks.
This didn’t work. At all. It was stiff and bulky, and just didn’t look good.
Looked kinda like what I was going for, but not really right.
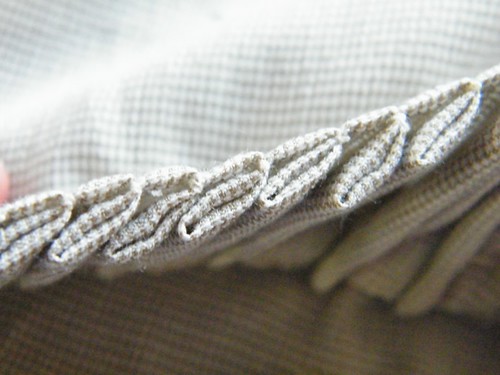
Although, up close and from the side, it makes a cool photograph
So, I tried again. This time, I used a single layer of fabric. I finished one edge with a rolled hem on my overlocker. I then hand pleated each row.
I was planning to use my fancy new ruffling foot, but I had tidied it up, and wasn’t sure which box it went into, so went the old fashioned-by-hand route instead. So, my pleats aren’t perfectly even, but I like the way they look.
Each of the rows took just under 150cm - the width of the fabric I was using.
I sewed each of these rows of pleats in place. Directing the hems to the centre front, I top stitched each row of ruffles.

Now, with my pieces all sewn together, I essentially had a centre front piece.
From here, I started making up the rest of my dress as normal.
What I should have done was added the fabric strip at the front the buttons would sit on. However, I didn’t, so I made my job a lot harder by having to add the fabric later.
But, what you do is take a strip of fabric 3cm longer than your centre front measurement, and 6cm wide. Press the edges under 1.5 cm. Pin down, and sew (top stitch) in place.
Using a nice long ruler (I love my 1 metre metal ruler), mark the placement of the buttons. Remember that odd numbers are almost always more visually aesthetically pleasing. Because the buttons are not functioning as an opening, you can space them evenly starting with the top and bottom button. If you are using buttons for an opening, you should place the first button at the nipple line, then space the buttons from there. It prevents gaping.
I used a blue fabric pen to mark the button placement.
Now, sew your buttons in place. I used self cover buttons with a shank. I'm not sold on the shank, but I'm pretty sure that I'm the only one who can see the shanks. So it's okay. (Oh, and because I added the strip down the middle after I had basically finished the dress, it looks a bit wonky, as do the buttons)
Give or take, I follow these steps:
* Sew centre front to side front
* Sew centre back to side back
* Sew shoulder seams
* Set in sleeves
* Repeat for lining
* Sew neck lines and arm holes
* Sew turn right side out
* Attach skirt
* Set zipper in left hand side and finish seam
* Sew right hand seam
* Hem
* Top Stitch neck and armholes (if not full sleeves)
* Stitch lining to main fabric
* Sew buttons in place
And, you’re done.
I;m really happy with this one. I love the contras of the crisp pleats and the ruffles and the poofy sleeve caps. And, the fabric (4m from an op-shop for $10) is awesome. It doesn't crease, so I can stuff it in a drawer at work, and pull it out, and it looks great. And, since I ride in and keep a weeks worth of clothing at my desk, that makes me very very happy.