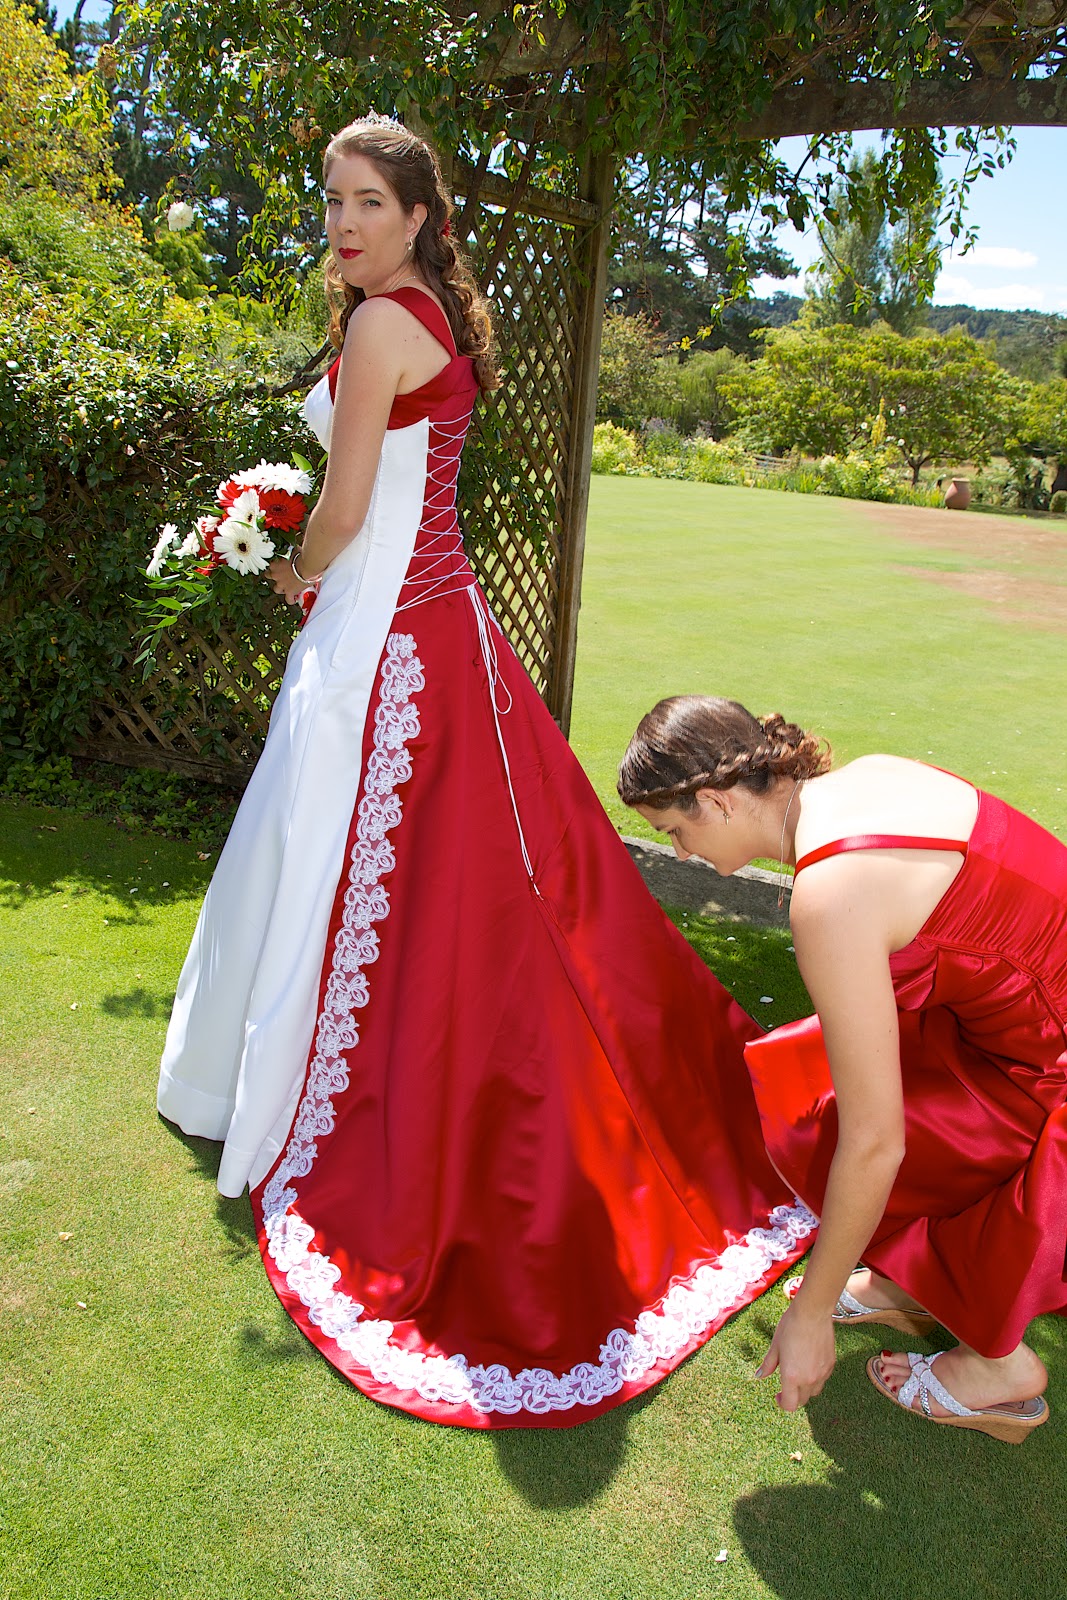
So. It's been 6 months, or there abouts since I last posted. I'm a bad blogger...
But, in my defence, 2012 was a busy year for me. I finished the course I was doing, while working full time, and also dancing two or three times a week, going hiking ever third or fourth weekend, and taking an extra class. I also applied to four costume schools. And made a wedding dress and 2 bridesmaids dresses.
Makes me tired just thinking about it.
The outcome of all of that in 2012 was that I got into WAAPA!!!! For those of you who don't know, WAAPA is the West Australian Academy of Performing Arts. (I also got into 2 of the other schools that I applied to... but WAAPA was the one I wanted). So, I moved across the country.
So now, I'm stupidly busy, and it's amazing. I really love it.
Oh, and the wedding was beautiful, and the dress looked stunning on the bride. By the end of the process, I think the pattern was more mine that it was the original Vogue 1095, and it was stunning and perfect. It has the button on the back to allow her to dance, and fitted so well - the first time I did a fitting on her where I could actually touch her was a week before the wedding, so I was so relieved. The bridesmaid dresses are my original pattern.
Showing posts with label dress. Show all posts
Thursday, April 11, 2013
WAAPA
Labels:
dress,
handmade,
lace,
lace up back,
lacing,
pattern alteration,
pattern drafting,
pattern making,
sewing,
WAAPA,
wedding
Thursday, December 29, 2011
strawberry shortcake dress.
The Strawberry Shortcake dress.
This is another knock-off from modcloth, based on their truly yours strawberry dress (although theirs is chiffon and mine is cheesecloth):
I made it months ago (seriously), and have worn it to a dance party, to my mother's graduation and not one but two weddings so far. And I really hadn't gotten any good photos of it to blog about. But, at the last wedding, it was perfect weather, and we got some good shots of the dress (although I did forget to photograph the shrug I made to wear with it that is the same pink as the midriff band... next time I guess).
This is another version of the burdastyle drape dress, and it's one of the three dresses I've made from the pattern so far. I'm very happy with this one - each of the pleats in the midriff band are basted into place to get them to stay though. I'm really happy with how well I lined them up. They match almost perfectly across the right hand side seam.
I didn't put the invisible zipper in perfectly on the left hand side seam, but I'm okay with that. I've worn the dress enough times that it's not really an issue any more.
I also made the fascinator that I'm wearing in each of these photos for a dance routine a few years ago, and I'm happy to be able to get a second chance to wear it.
The Details
fabric: lining 3 m poplin $4.55/m total $13.65; red band 5.m$16.60/m total $8.30; pink and silver fabric from stash; cheesecloth: 1.5m dark pink 1.5m dusky pink 1.25m light pink at $5.00/m total $21.25
notions: thread; zipper from stash
pattern: Burdastyle drape dress, used previously
total: $43.20
All up, this is one of my favourite creations. It isn't the cheapest thing I've ever sewn, but it's also in no way the most expensive. It's comfortable, and pretty and makes me happy every time I wear it.
This is another knock-off from modcloth, based on their truly yours strawberry dress (although theirs is chiffon and mine is cheesecloth):
I made it months ago (seriously), and have worn it to a dance party, to my mother's graduation and not one but two weddings so far. And I really hadn't gotten any good photos of it to blog about. But, at the last wedding, it was perfect weather, and we got some good shots of the dress (although I did forget to photograph the shrug I made to wear with it that is the same pink as the midriff band... next time I guess).
This is another version of the burdastyle drape dress, and it's one of the three dresses I've made from the pattern so far. I'm very happy with this one - each of the pleats in the midriff band are basted into place to get them to stay though. I'm really happy with how well I lined them up. They match almost perfectly across the right hand side seam.
I didn't put the invisible zipper in perfectly on the left hand side seam, but I'm okay with that. I've worn the dress enough times that it's not really an issue any more.
I also made the fascinator that I'm wearing in each of these photos for a dance routine a few years ago, and I'm happy to be able to get a second chance to wear it.
The Details
fabric: lining 3 m poplin $4.55/m total $13.65; red band 5.m$16.60/m total $8.30; pink and silver fabric from stash; cheesecloth: 1.5m dark pink 1.5m dusky pink 1.25m light pink at $5.00/m total $21.25
notions: thread; zipper from stash
pattern: Burdastyle drape dress, used previously
total: $43.20
All up, this is one of my favourite creations. It isn't the cheapest thing I've ever sewn, but it's also in no way the most expensive. It's comfortable, and pretty and makes me happy every time I wear it.
Wednesday, December 21, 2011
Some Gifts - clothing
First off, I have to apologise about the bad photos for both of these. I was slightly restricted for time for both of them - I gifted them the same day I made them.
Both of these dresses are being counted towards my Sew Weekly challenges for the year. In fact, I am using the dress, skirt and top to check off three of the challenges.
Firstly, a red dress for my friend D. I visited her in Perth recently, and ended up giving her the red and black lace look dress. This one.
She also mentioned that she really liked the style, but couldn't find anything like it in the shops. And that she was looking for a red dress. So, I made her one. I counted it as my "Do Over" item - it's exactly the same pattern, no alterations made, just made a second time around.
The dress is made from a red fabric I had in my stash, using thread from my stash and a pattern I'd used previously - meaning that it essentially cost me nothing.
Next, for my housemate C, who has vowed that she isn't allowed to buy any more black clothing, I made a skirt and a blouse. The skirt is counting towards the "Orange" Sew Weekly challenge, and the blouse is counting towards the "Patternless"challenge (although both of them are patternless).
C has been lusting after orange skirts, and mullet skirts (which I keep referring to as tulip skirts). I remembered that a while back, I had pinned this tutorial (which was featured on craftgossip) for a fishtail skirt.
Using that as my basis, and some thrifted orange cheesecloth in my stash, plus some new pink bias binding for the hem and waistband, I created a gathered waist version for C. For the top, I again used something that I'd seen on craftgossip, a tutorial for a wrap top. Which was inspired by the vintage photo below.
I used a double layer of warm white rayon, with a white cotton bias tape for the thin tie, and cream satin blanket binding for the thicker tie. Although, I may have to shorten each of the ties. But, that can come later.
Both of these dresses are being counted towards my Sew Weekly challenges for the year. In fact, I am using the dress, skirt and top to check off three of the challenges.
Firstly, a red dress for my friend D. I visited her in Perth recently, and ended up giving her the red and black lace look dress. This one.
She also mentioned that she really liked the style, but couldn't find anything like it in the shops. And that she was looking for a red dress. So, I made her one. I counted it as my "Do Over" item - it's exactly the same pattern, no alterations made, just made a second time around.
The dress is made from a red fabric I had in my stash, using thread from my stash and a pattern I'd used previously - meaning that it essentially cost me nothing.
Next, for my housemate C, who has vowed that she isn't allowed to buy any more black clothing, I made a skirt and a blouse. The skirt is counting towards the "Orange" Sew Weekly challenge, and the blouse is counting towards the "Patternless"challenge (although both of them are patternless).
C has been lusting after orange skirts, and mullet skirts (which I keep referring to as tulip skirts). I remembered that a while back, I had pinned this tutorial (which was featured on craftgossip) for a fishtail skirt.
Between the two of them, I'm very happy with the result. Both of them are adjustable enough to suit C, and allowed me to not need to surreptitiously gain any of her measurements.
The top used new fabric, bias binding and satin binding, and the skirt used new bias binding. All up, it cost me about $15 to make the outfit.
I used a double layer of warm white rayon, with a white cotton bias tape for the thin tie, and cream satin blanket binding for the thicker tie. Although, I may have to shorten each of the ties. But, that can come later.
Labels:
dress,
gifts,
handmade,
pattern drafting,
pattern making,
Sew Weekly,
sewing,
skirt,
upcycle,
upcycling
Tuesday, November 15, 2011
red draped dress
I've wanted a 1950s style dress for a while now. Like, a full on, over the top, puffy skirted party dress. So, I decided to make one. I frankensteined the pattern together, and tried some new techniques. For the first time, I used horsehair braid, and pick stitched a zipper.
The dress is my Sew weekly, week 6 'Seeing Red' Dress, and I wore it to a Frocktober dance party, which was held to help raise money for Ovarian Cancer Research.
The inside photos show the colour much better - it's a red, I promise!
The dress is my Sew weekly, week 6 'Seeing Red' Dress, and I wore it to a Frocktober dance party, which was held to help raise money for Ovarian Cancer Research.
My inspiration photos:
The details:
| Source: 1.bp.blogspot.com via fyrefairee on Pinterest |
| Source: wardrobechick.blogspot.com via fyrefairee on Pinterest |
| Source: vintageous.com via fyrefairee on Pinterest |
Fabric: Thrifted red with embroidered flower crepe from stash; red organza from stash; red poplin lining from stash, free, additional 2.5m red poplin, $11.40
Pattern: Burda Style Draped dress pattern, used before, free; Butterick 5457, thrifted, 50c
Year: 2011
Notions: Thread, from stash; 8m thin horsehair braid $9.60; 8m horsehair braid $14.40; 2m velett ribbon $4.40
First worn: October 2011
Wear again? Yes, it was super fun to wear :)
Total Cost: $40.30
Pattern: Burda Style Draped dress pattern, used before, free; Butterick 5457, thrifted, 50c
Year: 2011
Notions: Thread, from stash; 8m thin horsehair braid $9.60; 8m horsehair braid $14.40; 2m velett ribbon $4.40
First worn: October 2011
Wear again? Yes, it was super fun to wear :)
Total Cost: $40.30
The inside photos show the colour much better - it's a red, I promise!
Wednesday, November 2, 2011
Monday, October 3, 2011
self-Stitched-September Item 6
I'm a little in love with this dress. It was really easy to make, and didn't take long - all made on the overlocker!
The only change I made to the pattern was to shorten the sleeves and not include the ruffles. Otherwise, I actually followed the original pattern.
This dress is for the At the Races (Ascot) sew weekly challenge.
The Facts
Fabric: .5 metre Black knit $12.95/m, 2 metre black and white knit $12.95/m
Pattern: thrifted McCalls 5408, view C $1.00
Year: c. 2007
Notions: Thread
Time to complete: 2 hours
First worn: September 2011
Wear again? YES! It was super comfy
Total Cost: $33.40
Pattern: thrifted McCalls 5408, view C $1.00
Year: c. 2007
Notions: Thread
Time to complete: 2 hours
First worn: September 2011
Wear again? YES! It was super comfy
Total Cost: $33.40
Labels:
dress,
Self-Stitched-September '11,
Sew Weekly,
sewing,
SSS '11
Sunday, September 25, 2011
Self-Stitched-September Item 4
This dress got off to a shaky start. BurdaStyle magazine patterns and I haven't always gotten along in the past. There is the lack of seam allowances, the weird sizing (or, 'standard' sizing that never fits me, ever) and a few other things that we have disagreed about in the past. But, I'd had some success with BurdaStyle patterns recently (my Kasia skirt, the one piece kimono tee and the ruby shorts), so I decided to give the magazine patterns another go.
So far so good. I'm feeling happy that the patterns work, even if they miss like half the steps in the instructions. I can totally do a magazine pattern. So, when I downloaded the BurdaStyle Drapé Dress pattern the first time, I cut the pattern pieces out without adding any seam allowances. Fail.
I downloaded the pattern again, added my seam allowances, took out some facing folds (replacing them with full lining) everything was going okay. Then, after 5 or 6 attempts, I still couldn't get the drape waistband to sit how it should. So, I cut my losses and gathered the cotton gauze onto my poplin lining. I even stitched it down for good measure (or, so it would survive being thrown in the washing machine. Whichever you think is more... correct). Again, so far so good.
I added the bodice pieces, pleating them by hand (mainly because I didn't feel like dealing with gathering stitches anymore), and sewed the skirt on. Then I tried it on, and it was super tight. Like, I don't think I can sit down tight. Not the best way for a dress to start, really.
But, given that this was acting as my test garment, I kept going.
The next hurdle was the shoulder seam. It was much much to long. Like, 8cm to look. I divided this into three tucks, which I don't mind the look of. And, I even remembered to alter the pattern s the next version doesn't have too long shoulders.
This dress was sewn for the Something Floral, Something Blue Sew Weekly challenge. I wore it out to afternoon tea with friends today, and it was actually quite comfortable, not too tight at all.
Fabric: Thrifted Blue flower cotton gauze from stash; 4 m blue poly cotton $18.20
Pattern: Burda Style Draped dress pattern, $5.40
Year: 2011
Notions: Thread, 5 spools $3.25 each, total $16.25
Time to complete: Too long, with the troubles I had with the waistband!
First worn: September 2011
Wear again? Yes
So far so good. I'm feeling happy that the patterns work, even if they miss like half the steps in the instructions. I can totally do a magazine pattern. So, when I downloaded the BurdaStyle Drapé Dress pattern the first time, I cut the pattern pieces out without adding any seam allowances. Fail.
I downloaded the pattern again, added my seam allowances, took out some facing folds (replacing them with full lining) everything was going okay. Then, after 5 or 6 attempts, I still couldn't get the drape waistband to sit how it should. So, I cut my losses and gathered the cotton gauze onto my poplin lining. I even stitched it down for good measure (or, so it would survive being thrown in the washing machine. Whichever you think is more... correct). Again, so far so good.
I added the bodice pieces, pleating them by hand (mainly because I didn't feel like dealing with gathering stitches anymore), and sewed the skirt on. Then I tried it on, and it was super tight. Like, I don't think I can sit down tight. Not the best way for a dress to start, really.
But, given that this was acting as my test garment, I kept going.
The next hurdle was the shoulder seam. It was much much to long. Like, 8cm to look. I divided this into three tucks, which I don't mind the look of. And, I even remembered to alter the pattern s the next version doesn't have too long shoulders.
This dress was sewn for the Something Floral, Something Blue Sew Weekly challenge. I wore it out to afternoon tea with friends today, and it was actually quite comfortable, not too tight at all.
Fabric: Thrifted Blue flower cotton gauze from stash; 4 m blue poly cotton $18.20
Pattern: Burda Style Draped dress pattern, $5.40
Year: 2011
Notions: Thread, 5 spools $3.25 each, total $16.25
Time to complete: Too long, with the troubles I had with the waistband!
First worn: September 2011
Wear again? Yes
Labels:
dress,
Self-Stitched-September '11,
Sew Weekly,
sewing,
SSS '11
Self-Stitched-September Item 3
I’ve had some red Swiss dotted cotton sitting in my stash for maybe 9 months now. I bought it when I was trying to sew myself a professional wardrobe, and then (rightly) decided that it wasn’t really appropriate for work – a bit too informal. So, it’s just been sitting there. But, along with my attempt to work my way through the Sew Weekly challenges, and my Self-Stitched-September challenge, now seemed like the perfect opportunity to use it.
I had always intended the fabric to be a dress, and as I was looking through the challenges on Sew Weekly and my style pinboard on pinterest, realised that I had the perfect fabric for the Day After Dress from ModCloth. They seemed to be the perfect combination for the 'Imitation is the sincerest form of flattery' challenge. Yes, I know that ModCloth items aren’t that expensive, but when you add in international shipping, they tend to become just a bit outside of my price range, and the Day After Dress is sold out. So, I don’t feel quite so bad about ripping it off.
Source: modcloth.com via fyrefairee on Pinterest
Now, I probably could have drafted the dress from scratch, but I was feeling lazy. So I went through my pattern collection, and came across this pattern from 1978. On first glance, it doesn’t look too much like the Day After Dress, but it has the important neck band. So, all I would have to do would be add the waist band and shorten the sleeves. Simple!
I pulled the pattern out and realised that the pattern didn’t have either the hips or the natural waist marked. So, I kinda held it up against me, and figured that the cutting line for the shorter version fell at about my hip height. My waist is about 30 cm from my hip level, so I drew a line to mark the new ‘waist’ following the cut line. I traced out the pattern, added seam allowances, (including a seam allowance to the centre back), shortened the skirt pieces about 6cm, and used the piece I had just cut off the bottom as my waistband. For the sleeves, I really liked the raglan sleeve look, but it was way too long. So, I traced off the sleeve pattern, marking the cut line/hem as between the notches. And voila! I had a pattern for my very own Day After Dress.
Most of the work for this dress was in sewing on the piping. I made about 8m of pining, and 30cm of cording for the button loops at the back. That’s a decent amount of bias strips to make, but so worth it.
For the bodice, I used a self facing, but the skirt is unlined. I gathered and sewed, and added buttons, and hemmed.
And then, I was done. One Day After Dress.
It’s not exactly the same as the original – the main difference being that the back, with the open centre back seam, blouses out a lot more. I’m not a fan of the exposed bra look, so I’m probably going to have to sew a couple of hook and eyes on to keep things in place. But otherwise, I’m really happy with the result.
Fabric: red swiss cotton from stash; 1/2 m white poplin $2.30
Pattern: Simplicity 8412, with alterations $0.50
Year: 1978
Notions: 5 m piping, $3.50; zipper $3.00
Time to complete: An afternoon
First worn: September 2011
Wear again? Yes! This dress is super comfortable. But I will add some hook and eyes to the back so my bra isn't exposed.
Total Cost: $9.30
Subscribe to:
Posts (Atom)