Sunday, April 17, 2011

Mod-Cloth Inspired Alterations to a Princess Seam Dress

When I started my new job, and found that there was nothing I liked at the shops, I turned to the internet for inspiration. I browsed, and drooled over the modcloth website. Living in Australia, it's not so practical to buy things off modcloth (shipping makes things very expensive) and takes forever. Plus, this is the first real job I've had after finishing university, so modcloth - and a lot of other clothing stores - are out of my price range.

Some of the dresses though, seemed like good inspiration pieces. 

Take, for example, the 'On the job' dress:


I like the detailing of the gathers at the bust, and the fullness of the skirt. I'm a bit ambivalent about the sleeves, and the collar isn't really my thing.  But the silloheutte is awesome. 

My finished dress looks like this:


So, taking the inspiration of the on the job dress as a starting, inspiration point, I turned to my now favourite, trusty Butterick 4443 pattern. It's a princess seam pattern with a seam on the waist. I can whip the basic version of it up in a few hours. It fits well, and suits me.

It looks like this:
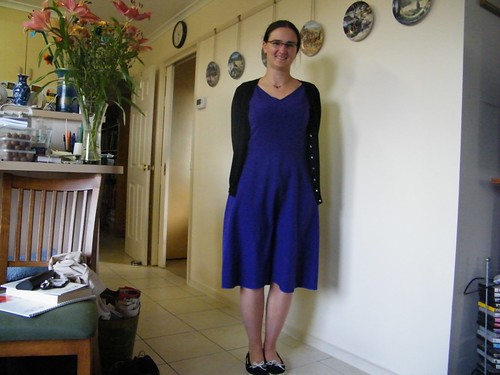

Using this as the basis for my pattern, I altered the pattern to reflect some of the detailing I liked in the modcloth dress.

The first thing I did was alter the sleeves. The sleeves included with the B4443 are cap sleeves. I  like cap sleeves, but find that my arms are bigger than the sleeves are designed for. So, I have to widen them.

Firstly, I trace the pattern piece along with all the original markings (red), and mark the seam allowance (black). 


For this piece, I am happy with how the sleeve sits in the armscye, I just don't like how tight it is around my arm. So, I want to add 4.5cm to the bottom seam. 

To make the alteration even, I will add the 4.5cm in three places - 1.5cm in each. So, I cut the sleeve into thirds.


Now I need to add the extra to the bottom hem. This is where that seam allowance I drew on becomes important. I am not altering how the sleeve fits in the armscye, so I don't want to change that seam length.

Firstly, I tape one of the cut pieces to some newspaper. Lining the seam line up so it touches,


I measure 1.5cm between the cut edges of the hem.


Taping it down, the piece looks like this:


I repeat this process for the other pieces, until I end up with a piece that looks like this:


You will notice that the top edge is not completely smooth where the joins are. I trace this piece, smoothing the curves, and filling in the gaps as I go, until I'm left with a piece that looks like this:


Next, take out your princess seamed pattern. Mine has a seam at the waistline.

Next, I altered the dress pattern. Because I had previously made the dress several times, I knew that the basic pattern fitted me well. I also knew that the seam I wanted to sit under my bust was 10cm from the waistline seam on the existing pattern pieces.

So, I took both of the front pieces (front centre and front side) and marked the side seams 11.5cm from the bottom (this allows for the 1.5cm included seam allowance), and drew a straight line between the marks. I then cut along the line. The first line you can see marked in the photo is the 10cm line, and the second is the 11.5cm line.


I originally lengthened the waist line of this pattern by 3cm, but when I fitted my shell, the back sat really oddly:

The front side panels also sat weirdly:

please excuse the face I'm pulling - it was late.


See how puckered that back and side is? That's because when I lengthened the waist on this pattern, I forgot that I had already lengthened the waist on the pattern I was working from. This is why it is a good idea to mark patterns with any alterations that you have made.

So, I went back and redrafted the pattern without the extra 3cm at the waistline.

Now, one of the features I liked about the on the job dress was the bow at the back that was giving shaping to the back of the dress. There are no shaping seams. So, to recreate this look, I took my side back piece and centre back piece and marked the seam line that would join the two pieces. 

You will notice in a lot of the photos my pattern pieces are taped to newspaper. I do this to stop them moving while I am working with them, before I trace the final pieces to use when cutting out.


Next, I took both pieces and joined the seam line up from the top of the seam.

To do this, I laid the pieces on top of each other. Because I use tissue paper to draft my patterns, you can see through it to the layer below:


I then carefully lined up the seam lines, above the notch:


Because I was lining the seams up above the notch, it meant that the seam line below the notch didn't match up:


Basically, I have gone from a princess line seam to a darted seam. So, if you have a favourite pattern that uses darts, not princess seams, you could use it from here to create this dress.

Next, I traced around the pattern I had made. Because the dart really only added 2cm to the waist line (not nearly enough to add the gather-y look I was after for the back), I measured the side seam, made sure that the new seam line was the same length, and added 6cm to the waist hem line:


You should also mark the point where the seams have been joined at the armscye, as this is the point that the sleeves are added.

Next, I moved on to drafting the front, with the gathers.

I took my shortened centre front and side front pieces, and marked the seam lines again:


I again laid the pieces on top of each other, lining up the top of the seam to create a darted piece once more:


The seams at the hemline are much further apart than on the back piece:


Trace around your pattern pieces, smoothing the hem line, and remembering to add a 1.5 cm seam allowance. You should also mark the point where the seams have been joined at the armscye, as this is the point that the sleeves are added.

(take photo of this)

Next, I moved on to the skirt. I wanted a full skirt, but no gathers or pleats at the waistline, and no seams on the front waistline.

I took the original skirt piece (an A-line skirt), drew on the seam line at the waist, and split it into 4 pieces:


I then added 7 cm between the hem line of each piece, keeping the waist seam line lined up (very similar process to the sleeve alteration)


Do this to both the front and back skirt pieces. For the back piece, I then added 6cm to the centre seam to account for the extra 6cm added to the bodice pieces.

The next step is to add the lower front pieces to the skirt pieces.

I forgot to take photos of this step.

Now, I used the cheats method for this. 

What I do is take the lower front pieces, and mark the waist line seam on them. I then line this seam at the edges with the seam for the skirt, and split the skirt piece where the two bodice pieces touch. The reason that I say it's the cheats version is that there is a half moon of extra fabric between the two seam lines. I don't mind this, and the dress doesn't sit badly with this slight extra fabric, but if you are a perfectionist, you may not like this method.

Lastly, I added a 1.5cm seam allowance to the top of the bodice pieces.

Your pattern is now altered, time for construction!

Now, I didn't take any photos of my construction process (I'm a bad blogger), so you'll just have to bare with me and my dot points. I do suggest making a shell of this dress to check that you can get it on and off, and to check the fit. It doesn't include a zip, so you do need to ensure that the waistline is large enough to fit over your head and shoulders and bust.

Construction:
  • Cut pattern pieces: 2 of each, except centre front skirt and front bodice, which you cut on the fold. Cut from both fabric and lining (I cut my lining 15cm shorter than my main fabric)
  • finish edges (overlock or zig zag stitch) all skirt piece side seams
  • join shoulder seams of bodice pieces. Press seams
  • finish lower edge of sleeve. I used a rolled hem stitch on my overlockers. Sew sleeves to bodice
  • sew lining and main fabric together at neckline and arms. clip seams and turn right side out.
  • sew front skirt to side front skirt. press seams flat
  • add long gather stitches to bodice front 
  • pin skirt front to bodice front
  • gather bodice so that gathers are about 2.5cm wide, above skirt seams
  • sew skirt front to bodice front and skirt back to bodice back
  • press seams upwards
  • sew side seams
  • press open
  • hand stitch along seam allowance along waist seam at back and under bust seam at front to fully enclose bodice (this is why you didn't have to finish any of the bodice seams)
  • top stitch neckline, and arms below sleeves
  • hem. I used a rolled hem from my overlocker.
  • remember that you need a tie at the back. Cut a piece of fabric 10cm wide and 150 cm long. fold in half and sew along the long edge.
  • turn through, and press flat. cut in half and cut off selvage.
  • turn one end in. top stitch along 3 sides (including your turned under end). I finally realised with the left hand needle function was for with this lot of top stitching - it allowed me to stitch about 1.5mm from the edge of the fabric, using the centre of the presser foot as a guide.


  • sew to dress, 8cm from side seam, with the ties facing the front
  • clip corners of ties, fold towards centre back, and sew down
Done! Yay!


Thursday, March 31, 2011

Me-Made-March 2011 Wrap Up

So, I know I haven't really been keeping you at all up to date about Me-Made-March, but that's okay, I guess (and meant that I got an extra bit of sleep every night that would otherwise have been spent blogging, which makes me immensely happy.

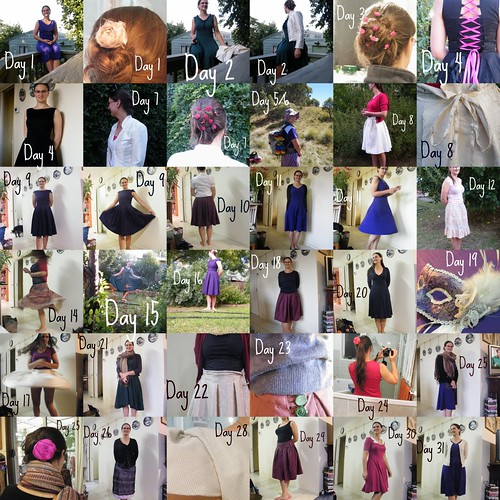
Today was the final day of Me-Made-March, and in some ways, I totally achieved my pledge, and in others I kinda failed. And by that, I wore an item of me-made clothing every day in March (Yay! go me!!). But, I didn't have a med-made accessory every day - I probably only had a me-made accessory half of the time (fail - boo me!). Which reminds me that really, accessories and I don't get along very well. I don't really do scarves or belts, I wear things in my hair rarely, and I have a calico tote bag and a back pack that suit me perfectly well for carrying my stuff. So, perhaps, knowing this about myself, it might have been a bit... silly... of me to decide I was going to have a me-made accessory every day. But, it was a learning experience.

I probably could ramble on for a decent while longer about my me-made-march experiences, but instead I'll post this photo, and say, there are sewing adventure posts in the works!


(And, yes, I know I missed day 13 and 27. I forgot to photograph day 13, and forgot to add day 27 to the collage)

Wednesday, March 23, 2011

A teaser - or, what I'm working on

I'm still sewing a lot, (especially now that my sewing machine is fixed and back), but not as frantically as I was when I first started my job. I have 6 outfits that I can rotate through for work, and 7th when I re-hem the soft magenta dress. So, the sense of urgency isn't there, so much, and more.

But, because I am still sewing, I don't have anything really to post about.

So, instead, you get a teaser of my work-in-progress.

This:

As you can see, drawing is not something I'm great at.
Has become this:

Sewing on the other hand, I'm pretty good at.

I hope to have this one finished by the weekend to show you all!

Thursday, March 10, 2011

Musings on dressing for work

Friday will be exactly 4 weeks, or one month that I have been at my real-person job.

And, it will be 11 days that I have been participating in the Me-Made-March.

And, of course, there was the death of my sewing machine (a bit overdramatic, yes, I know – I got it back on Friday, good as new, and in the mean time bought myself a baby sewing machine, which happily sewed me two skirts and a jacket).

Between these three things, I haven’t really had a lot of time to devote to the blog. Although, I have been sewing heaps.

So far, I have created three dresses, two skirts and a blazer. I have added two dresses I made years ago to this, and I have basically been able to dress myself each day for work. I have 7 base items to build my day’s clothing from. I’d like it to be closer to 20, but I’m working on it. Really.

I have discovered a few things along the way.

I love dresses. This isn’t a new revelation for me, but, it was really bough home to me over the last few weeks. I like being able to get dressed in the morning, and only have to pull on a single item of clothing, and be ready for the day. It makes me happy. I don’t think I’m alone in this. Natalie Chanin wrote something very similar in the Alabama Stitch book, I think.

Stretch dresses are lovely to wear, but a bit harder to wash. The first time I washed the burgundy-with-white-collar dress, I forgot that the skirt was made of a single circle of fabric. One way stretch for that matter. So, I now have a weirdly stretched skirt that I need to re-hem an even length. When I washed the green stretch dress, I washed it in a delicates bag, and didn’t have the same problem.


I really dislike high neck-lines. Again, this isn’t a revelation. However, I’ve only worn the purple cap-sleeve dress once because the neckline sits about 1.5cm above my collar bones. For most people this is fine, but I find it unnecessarily uncomfortable. I wore it a second time today, and it wasn't as bad - I think the fabric had stretched just that little bit that it sat a touch looser. Which is good, because I was really dreading having to alter the neckline, with the fully lined bodice.


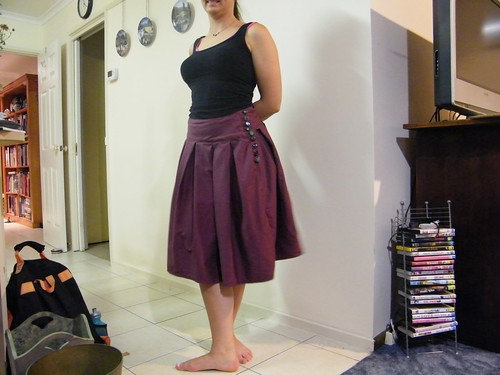
I don’t like high-waisted skirts. Again, not a revelation, but when I was making the shell for a pleated skirt concept idea I had, I thought it might be kinda cute. I ended up at the conclusion that while I don’t hate it (and, in fact, I’ve worn the shell to work several times now), it’s not my favourite style.


While matching skirts-jacket combinations work, cream and white just make you look like some sort of strange bride who got lost on the way to the alter.

Blazers are great for getting to and from the office, but I find them a bit restricting actually wearing them day to day. It’s something I might get over with a bit more wear, but so far, each time I wear a blazer to work, it gets taken off almost as soon as I sit down and start typing.


For commercially made patterns, I have to take 1cm out from between the nipples, and add it to between the nipples and side seams. This is mainly because I have a large bust and a small frame, so my nipples (and for that matter, my breasts) sit closer together than the dress-form the pattern sizing is based on. If I forget this step, it’s not a disaster, it just looks better if I remember it. Like in this purple dress I made years ago. It fits and sits fine, but I know that the princess seam is sitting about 1 cm to the outside of here my nipples are.


Doona (Duvet or Blanket) covers can make great shells (muslins) for clothing. Each of the shells I have made are actually wearable, for not much money. This goes for the pleated cream jacquard skirt, the cream jacquard blazer, and the burgundy pleated skirt.


I really like the lacing at the back of this dress. This is one of my not-new items, but I like it as much as I did then. It is slightly higher around the neckline that I would like, but because the back is open, it doesn’t pull to much, so I can get through a full day without fiddling with it too much. The one downside is that I do need to wear a black singlet top underneath it, making the dress slightly too warm for summer. But, the lacing adds a bit of my tastes to an otherwise simple dress (and means that I just need to pull on a cardigan, and I look totally respectable and corporate, but if I take the cardigan off, I can be a bit more me.


And lastly, I need more t-shirts. Plain colours, blacks and creams, but more of them.

My two major sources of inspiration for my wardrobe were mod-cloth and anthropologie. I didn’t set out to create knock-offs of any of their creations, simply to use them as inspiration. And, that worked. I tried to figure out what drew me to each of the pieces – was it the neckline? the detailing? the silhouette? the colour? and then incorporate that into my creations. It’s a technique I’ll use in the future.

In some ways, I’m lucky that, even before deciding I would have to sew myself a work wardrobe, I have basically figured out what works and doesn’t work for my body-shape. I can now (mostly) look at a pattern and know if it’s going to work on me or not. And, thankfully, my tastes align with what works for me.

In terms of an appropriate work wardrobe, I’m lucky that my workplace doesn’t have a dress-code. Not a formal one at least. So, I have been able to take my own style and make it work for my job. I wear colour, but tend to steer clear of busy prints. Jewel tones and rich colours work well, especially when paired with block coloured (black or beige/cream) cardigans. In some of my outfits, I feel a little like I should be going to afternoon tea with the other debutants, but that is largely because I have chosen a silhouette that wouldn’t look out of place in the 1950s. because I feel comfortable in it. I would suggest anyone looking to get a corporate wardrobe to do the same. Think about what you are comfortable in. For me, that is dresses and skirts. This about sitting still in an air-conditioned office all day. I am cold almost all the time, so I find it really necessary to have a cardigan with me at all times. But most of all, I would say, let your clothing reflect as much of you as possible while conforming to the dress codes (written or unwritten) of your office. For me, that means that I have necklines that aren’t plunging, and skirts that are at least long enough to reach my knees.

I’ve also learnt that I’m not great with accessories. Because of the lack of sewing machine and time, I haven’t sewed any bags like I wanted to. So, with the exception of the rose I made for Day 1 of MMMarch, I have kinda cheated with the accessories. And by cheated, I’ve been calling my store-bought ribbon roses that I threaded onto hair pins my ‘handmade accessory.’ Which even I can’t kid myself is kinda stretching the definition of handmade. A touch. With the weekend coming up (well, not really, it’s only Tuesday), I hope I can make a few accessories that really are hand made, so I can stop cheating.

So, that’s a quick recap of what I’ve learnt in a month of my real-person-job.

Monday, February 21, 2011

Gah! Machine Failure!

My sewing machine died today.

It sews 2 stitches, then the threads get caught around the bobin, and it gets all tangled and angry. I have tried rethreading it, I have tried putting a different needle in, i took the plate off and got rid of all the little bits of fluff, I tried tightening and loosening the tension on the bobin, I tried both of sides of the tension plates for the needle thread, I tried different stitches, and I held the threads tightly, so that they weren't getting sucked into the first few stitches. Nothing worked. I came to the conclusion that the needle thread isn't being released properly by the bobin casing each stitch. So I end up with many of them, all wrapped around the bobin, which is bad and my machine makes a scary sound and generally, it just isn't good.

Now, normally this wouldn't cause me a great problem. I'd just take the machine in to be serviced (which I really should have done months ago, because the last service was seriously a decade ago. Scary to think that I've had the machine long enough to have a service a decade ago - and that was after having the machine for at least 5 years. (It's and Optima 190 - they were made in the mid eighties, so the machine is about the same age as I am.)  But, now, the fact that I will be sewing machine less is freaking me out - I have exactly one weeks worth of clothing that I can wear to my new office, real, adult job! I was planning to sew another 2 or 3 outfits this week. But now, I can't.

Totally increasing my stress levels.

Hope all your machines are working well!

Monday, February 14, 2011

Me-Made-March 2011

I somehow didn't publish this post, even though I actually participated in Me-Made-March,a nd gave you a quick wrap up of it. So here, very very late, is my Me-Made-March pledge:

I, fyrefairee from http://sewingsoffyrefairee.blogspot.com, sign up as a participant of Me-Made-March '11. I endeavour to wear as much hand made clothing as possible, with the exception of undergarments, tights, and possibly cardigans, each day for the duration of March 2011. I also endeavour to make and wear at least one accessory (bag, brooch, hair clip) each day, and to build myself a working corporate/ work wardrobe.

Last Friday, I excitingly and frighteningly started a new job as an executive assistant. Which means that almost all of my current wardrobe is not work appropriate. I spent too many hours on Saturday walking from shop to shop to shop (something that I haven't done since before taking the Wardrobe Refashion pledge), despairing more and more because nothing fitted, nothing suited, and the few things that were even vaguely reasonable were so overpriced it made me want to cry a little. Unless the cardigan is made of silk, there is nothing to warrant it being $80. Nothing. There isn't enough fabric, or labour in it to warrant that price tag.

So, I came to the conclusion that I would have to make most of my work attire. So, this challenge comes at a perfect time for me: by March I should have enough clothing to actually be able to wear self-stitched creations all months.

And, because I was already planning to create as much of my own wardrobe as possible, I decided to stretch and challenge myself by also wearing one accessory - a hair clip, a brooch, a bag, whatever - each day.

Me-Made-March is being hosted by Zo, from So, Zo... What do you know? and you can sign up here.

Excited? I know I am!

Sunday, February 6, 2011

Some Aprons

I made two aprons for Christmas presents - one for my father, and one for my grandfather. Guys are really hard to hand make for, so aprons seemed like a great option. Living in Australia, many of the interwoobs suggestions about hand made Christmas presents for guys just don’t work - scarves and blankets are totally the wrong time of year, wrong weather. This Christmas was relatively cold, and we got a bit of rain, but it was still up around 20 〫C. So, not really scarf or blanket weather. Hence, the decision to make aprons.
These were sewed the night before Christmas Eve, at about 1am. I was sick (I managed to get sick four days before Christmas - worst timing ever), so taking photos was really the last thing on my mind. I managed a few photos of the process, well, the cutting out really, and then I gave up.
I even forgot to get after shots of one of them - it was the same green Christmas fabric as the napkins, with bias binding (made by me) of the red napkin fabric. I gave that one to my grandfather, as part of a matching ‘set’ with my grandmother’s present of a set of eight Christmas Tree napkins.
The other apron I sewed was for my father. I made it out of a navy drill, added a pocket, and used a blue and red spotty stripy on white bias binding to finish the edges and the top of the pocket.
To start with, I took an existing apron, and used it as a template, by lying it on top of my fabric.

Then, I cut around the existing shape - I made it a bit longer, but otherwise maintined the original apron shape. If I had more time, I probably would have made a paper pattern to use, but at 1am, using the original as a pattern seems like a much better idea.

Because I was using a full apron as my template, it was a little uneven or asymmetrical, so I folded it in half, cut the curved bits so they were even, and laid it flat again. 
Next, I cut a rectangle of fabric for the pocket. I bound one edge, and folded the other three under. I placed it in roughly the middle of the apron (I was eyeballing it, so it might be slightly off centre), and pinned it down. Then, I sewed about 1mm from the edge of the folds, and the apron had a pocket. I also gave up taking photos at this point.
Next, I bound all of the straight edges of the apron - so, the sides, bottom and top. I sort of did the thing with the corners that means they are all neat. For the life of me, I can’t remember what it is called though. I used a top stitch only, rather than sewing the binding down and then top stitching it.
Lastly, I bound the curved sections. I decided roughly how long the neck loop should be, and made that the middle of my bias binding strip. I then pinned everything in place, with a decent overhang for the ties. Again, I only used a top stitch.
And, with that, I had 2 aprons. And it was only 230am or so...


The Christmas Aprons went down really well, and my aunt put in an order for an apron for her birthday, which is in early February. I asked if there was anything she specifically wanted in an apron, and she said that she wanted a pocket.


My aunt really likes red - in fact, most of my mother's side of the family does. So, I went looking for red fabric - and ended up with a blue, white, beige and red striped fabric. I also had some red fabric left over from sewing the Christmas aprons, so I decided to use the red as a contrast fabric.

I follow a ton of sewing blogs (I really do, there's heaps of them. They are awesome, and really inspirational. I probably spend an hour or so each day reading sewing blogs, getting inspiration. I've recently taken to saving pdf files of any post I think is awesome, because bookmarks don't really work for me.) In my blog-surfing, I came across this awesome tutorial for a fun, gathered apron. I decided that was what I was going to base my aunt's apron on.

I made a few changes - the main one being I added a pocket and didn't put the ruffle on the bottom. I also made the apron fully reversible.

Side One - Mum thought that the excess  from the strap looked like it needed something hanging from it. So, given the buttons are a tea cup and tea pot, I thought a tea diffuser would be perfect.

Side One

Side One

Side Two

Side Two

Side Two


And, lastly, I added a pair of buttons, because the neck strap was too long.


Cute, huh?