Sunday, December 26, 2010

Edible Christmas Gifts

As I mentioned in a previous post, I have been trying to be good, and have a totally hand-made, hand-baked, thrifted Christmas. I managed this, with only two little exceptions (more about that in another post). 


For some people, this meant they received thrifted gifts. For others, it meant receiving things I had sewn or crafter. And, for others (those that are the subject of this blog), they received things I had baked.


The first round of baking was cookies and biscuits from the CWA (Country Women's Association) cookbook. These were given to twelve of my friends, each with three or four cookies in a packet. I sadly forgot to take any photos, or, for that matter, write down which recipes I used for these gifts, so that's about all I can say on the matter.


The second round of baking was brownies for my secret santa at work, my team mates, and the people from my dance class. So, 18 gifts all up this time. My brownie recipe makes a LOT of browines, but because I was giving so many gifts, I decided to try a variation of it.


My original Brownies:
I adapted the brownie recipe from a friend’s cookbook, which I think was called home food. 


250g butter (I use unsalted)
500g - 600g eating chocolate (I prefer using dark chocolate) (eating chocolate is better quality that cooking chocolate, for about the same price. I figure, why use lesser quality ingredients?)
1 Cup cocoa powder
2 Cups sugar
1 1/2 Cups Plain flour
1 1/2 teaspoon baking powder
6 eggs
1 packet chocolate chips (again, I usually use dark chocolate chips)
*Melt butter and chocolate. 
*Stir in cocoa and sugar. 
*Stir in plain flour and baking powder. 
*Mix in eggs.
*Mix in chocolate chips. 
*Divide mixture into two dishes, if not silicon, line with aluminium foil or baking paper. 
*Bake at 180C / 350C until knife comes out clean. Remember that there are chocolate chips, so this might be a bit tricky, but I have served these slightly undercooked, and because of how much chocolate is in them, they solidify a little as they cool.


My White Chocolate and Macadamia Brownies:

250g butter (I use unsalted)
500g - 600g white eating chocolate 
2 Cups sugar
1 1/2 Cups Plain flour
1 1/2 teaspoon baking powder
6 eggs
1 packet white chocolate chips
1 packet macadamia nuts.
*Melt butter and chocolate. 
*Stir in sugar. 
*Stir in plain flour and baking powder. 
*Mix in eggs.
*Mix in macadamia nuts and chocolate chips. 
*Divide mixture into two dishes, if not silicon, line with aluminium foil or baking paper. 
*Bake at 180C / 350C until knife comes out clean. 

Because I was giving these as gifts, rather than baking in the usual square silicon containers, I used the fairly sizeable collection of silicon cup cake shapes we have. This gave me brownie bites, which hold together better than if I had just cut up a larger portion.

I had found six huge huge wine glasses at an opshop, so I decided to use two of them as presentation of the brownies for my secret santa. I figured that even if he didn't like brownies, he would like large wine glasses what 21 year old male doesn't?)

To present, I filled both glasses with brownie bites, then cut slits in the middle of sheets of cellophane. I slipped the stem of the wine glass through the slit, so that the glass was covered with cellophane when I tied a ribbon around it.

They ended up looking like this:


It wasn't until after I had given them away that I realised that taking photos of green things against a green leafy background is perhaps not the most sensible idea. Ah well, I know for next time.

Next I wrapped up the brownies bites for everyone else. This was a bit easier, because I wasn't wrapping wine glasses, but the fact that I was wrapping 18 of them made it a bit tricky. Partly because I didn't know how many each person was going to end up getting.

So, what I did was lay the cellophane out in rows on the kitchen table. That way, I could just go along the rows adding a brownie to each pile until I was done. I ended up giving each person four brownie bites.

Next, I simply gathered the cellophane up and tied it with curling ribbon. Which I didn't curl.


They looked pretty awesome when they were all together in the boxes.

And, they went down really well :). I was very pleased with the response to them. I hadn't made the which chocolate versions before, but the general consensus was that they were totally edible, and that people would happily eat them again.

The other thing I made as Christmas gifts were fruit mince pies. I normally make about 12 dozen in any given year, and so far this year, I have made 12 1/2 dozen. So, right on target. I might end up making another dozen or two, to take on holidays with me.

The recipe I use isn't mine, it's my mother's. I took over making them when I was about 15, and now they are part of my Christmas routine (the other is making mushroom filled pierogi, an integral part of our Christmas celebrations).

I went overseas a few years back, and wasn't around for Christmas, so mum sent me her recipe. I have simply copied exactly what she sent to me:


FRUIT MINCE PIES 
My mother always says, when offering guests fruit mince pies, that that you get a lucky month every time you eat a mince pie at a different person’s house ie if you visit 12 houses and have a mince pie at each, you will be lucky for the entire year.
PASTRY
1 cup plain flour
1 cup self-raising flour
½ cup cornflour (proper corn cornflour, not wheat cornflour)
¼ cup icing sugar
¼ cup custard powder
250 gram butter
¼ cup iced water, approximately

  1. sift dry ingredients into basin
  2. rub butter in evenly (I use a pastry cutter to cut the butter into the dry ingredients, then finish off with my hands)
  3. add enough water to make ingredients just cling together
  4. knead lightly until smooth (recipe says to do this on a floured surface, but I don’t use flour)
  5. divide pastry into 4 balls
  6. wrap in plastic food wrap and refrigerate for 20 minutes or more
  7. roll pastry – if it has been in the fridge for a while, it will be solid, but it will gradually roll out, and it is actually more workable this way than if it is sticky and soft because it is too warm. 
FRUIT MINCE
ORIGINAL RECIPE:
125 gram beef suet
250 g (1 1/3 cups) seedless raisins, chopped
125g (2/3 cup) currants
60g (1/2 cup) chopped almonds
30g (1/3 cup) chopped mixed peel
45g (1/4 cup) chopped dried figs
30g (1/4 cup) chopped dried apricots
30g (1/4 cup) chopped dates
2 medium apples, peeled, cored and grated
125g (1/2 cup) sugar
½ teaspoon ground nutmeg
½ teaspoon ground mixed spice
½ teaspoon ground cinnamon
½ teaspoon ground cloves
300 mls (1 ¼ cups) brandy
125 mls (1/2 cup) medium sherry
separate beef suet from tissues and chop finely in a food processor or with a French knife dipped in flour (butcher may do this).  Place all ingredients in a mixing bowl and stir together with a wooden spoon until all are moist.  Cover bowl with a plate or tea towel (not plastic wrap) and store in a cool dry place for 2 weeks, checking every five days and add 3 tablespoons extra brandy or sherry if fruit has absorbed all liquid.   Pack into clean stoneware or glass jars, cover surface with a circle of waxed paper, then cover securely with cellophane paper or tops of jars.
WOJTASISED RECIPE
Start out with double quantities:
1 kilo pack of mixed fruit (avoiding the type with glace cherries because I hate glace fruit)
4 medium apples, peeled, cored and grated
Add (quatity varies according to what is available and how much gets eaten whilst making fruit mince):
1 or 2 packets of almonds (could be 125g packet but who reads labels)
Wheel of dried figs
Packet of dried apricots (again, who reads labels)
Dates optional because they’re not my favourite commodity
Mince all of the above in a mincer (I have never tried a food processor, but suspect it would have to be watched carefully to ensure that the fruit mince remains in small bits rather than homogenous mush)
Transfer to a large mixing bowl and add the following:
250g (1 cup) sugar
1 teaspoon ground nutmeg
1 teaspoon ground mixed spice
1 teaspoon ground cinnamon
1 teaspoon ground cloves
Add some brandy and sherry while restraining Chris (my father) from going overboard on soaking the mince in grog. Use mince immediately for the first batch of pies (because everything has been left until the last minute as usual).  Cover bowl with plastic wrap and store remainder in fridge, using as needed for more mince pies.
The fruit mince pie tins I use have a fairly shallow, round mould, so that the pies have a round base without sides, and I like a pastry star on top, rather than a lid.  
We usually make two types of pies: the ones with fruit mince we made that year, and stronger ones with fruit mince we made the year before. Now, before you freak out, remember that our version has NO MEAT in it. None. It's mostly dried fruit and alcohol. So, we put a decent amount in a sealable jar, add a few inches of brandy or sherry on top, and put it in the back of the fridge for a year. These pies really are quite alcoholic - I'm pretty sure that there is too much alcohol to disappear totally when they are baked.
This year, my great-aunt was coming to our Christmas celebrations, and she is gluten-intollerant. So, in addition to the normal pastry, I also made gluten free pastry. I used a pizza and pastry gluten free mix, and followed the recipe on the packet for short crust pastry. They turned out very well, if I do say so myself.
My gluten-free-great-aunt was given some fruit mince pies for Christmas, as was my secret santa. (My extended family is quite large, and we instigated a secret santa for part of the family this year. It worked quite well, amazingly).


Sunday, November 21, 2010

I'm a bad blogger

Gah!

I am working on like ten projects at the moment, but I haven't finished anything, and almost everything I am working on is a Christmas present, so I can't post about it until after Christmas anyway. Which is making me a bad blogger.

I would promise to blog again soon, but I have no idea the next time I will be making something for myself, or indeed something that I can blog about - so, until then, thanks for reading, and I (hope) to be back, and sewing more frequently, after Christmas.

Thursday, November 4, 2010

Simple refashion - skirt to shorter skirt

So, this is a really really easy refasion.

I started with this skirt.


The skirt was too tight around the waist, so I cut most of the top panel off, leaving enough to fold down to make a casing for elastic. To do this, I turned the skirt inside out, folded the top panel down to the ruffle, and pinned along the lower seam of the ruffle. Using this as a guide, I cut about 1.5cm past the line of pins.


This gave me a panel above the ruffle of about 5cm.


Next, I folded the panel in half, and folded it down over the back of the ruffle and pinned it in place.

Turning the skirt right side out, I sewed along the original line of stitching, leaving a gap of about 5cm to allow me to thread the elastic into it. Looking at the inside of the skirt, this created a casing I could feed elastic through.


I fed elastic into the casing, stitched the gap closed.


And, I had one upcycled skirt - cute pattern, cute length.

Monday, November 1, 2010

Wardrobe refashion

I have signed up for the wardrobe refashion challenge. For two whole months! Eek! So exciting and scary all rolled into one.

So, as part of my sign up, I am posting my pledge here.

I fyrefairee pledge that I shall abstain from the purchase of "new" manufactured items of clothing, for the period of 2 months. I pledge that i shall refashion, renovate, recycle preloved items for myself with my own hands in fabric, yarn or other medium for the term of my contract. I pledge that I will share the love and post a photo of my refashioned, renovoted, recycled, crafted or created item of clothing on the Wardrobe Refashion blog, so that others may share the joy that thy thriftiness brings! Signed fyrefairee.


wardroberefashion.jpg

Friday, October 29, 2010

Fabric Flower Texture


Now, I have to preface this by saying the finished texture really doesn't look like flowers. Not really. But, it is a useful reference point to describe the technique I used to create this texture.

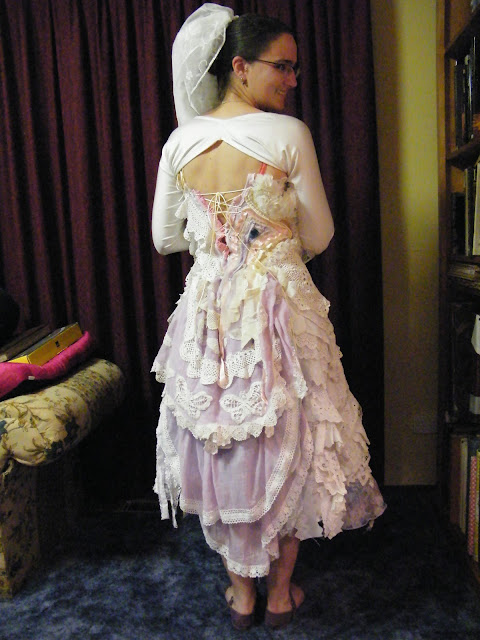
I used this texture as part of my most recent project, the Stomp dress.

These flowers are really really easy to make, but time consuming.

I think that I got the idea and basis of this technique from this wreath tutorial here, which I origianally found through craftgossip here.

Okay, so what I did.

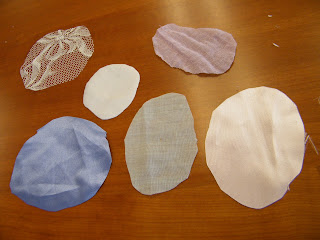
Firstly, I cut a bunch of basically circular shapes - or roundish shapes - from a variety of fabrics.

As you can see, they aren't perfect circles.


Then, take a circle. Fold it in half, then in thirds.


Put five or six stitches into the overlapping edge, near the point.


Congratulations, you have created the first of your flowers.


As you sew, you end up with a cool looking pile of flowers.


Now, you have to sew them to your dress (or top, or bag, or whatever it is you are covering with the texture).

Each of the flowers need to be attached individually. Sounds easy right? Well, it is, it just takes a while.

Starting at the top edge, take a flower. I sewed them  on along basically straight lines. Each flower only needs a single stitch to stay in place. The stitch should be placed near the tip - most of mine were 5-8mm from the point. I worked from right to left, placing each flower about 5mm from the previous one, and each row about 5mm from the last.

Build up, row by row.


Monday, October 25, 2010

Veil

The last thing that I needed to complete my Stomp costume was a veil - to complete the murderess bride look.

After a quick search of the interwoobs, I found the ehow tutorial for a veil here, and decided that it sounded easy. And you know what? It was

I'm not going to repeat their instructions here, because they are already available. I will, however, post my pictures.

The veil was incredibly easy to make. I used curtain elastic rather than bridal tulle, and was really pleased with the result.

So, I cut a rectangle of curtain lace (mine was 213cm long), and folded it in quarters.

I cut a curve along the not folded edge.


Next, I bound the edges with silver bias binding. I used a clear thread and a wide, short zig zag stitch.


Lastly, I folded the veil unevenly in half, so that one edge was longer than the other (and, I forgot to take photos - bad blogger that I am). I sewed a really long hand stitch along the fold line, and gathered it to the length of the comb I was attaching it to. I finished the edges off, and then hot glue gunned it into place.


Miniature poison bottles

Again, this is part of my Stomp costume.

As I had decided to go as a murderess, I needed my methods. I found a dagger-like letter opener, which I wore under my dress, held in place with garter elastic.

But, as this was under my dress, it wasn't particularly obvious. So, I added the more obvious element of small vials of poison.


These were super easy to make. The hardest part was finding the vials to begin with. In the end I picked them up in my local bead shop for 10c each. A huge thanks to the kind lady at bead street who sold them to me - they turned out to be perfect.

The vials had price stickers on them, which were easily cleaned using Eucalyptus Oil.


Once clean, I took thin cord, the same as I used to lace up the dress and on one of the straps, and made the hangings.

To do this, I firstly made a loop about half the length of the vial.


Then, I turned the end back, towards the top of the vial.


Next, about half way along the loop, I started to wrap the cord around the vial.


I wrapped a total of 4 times for most of the vials, and then cut the end off about 2mm past the original loop.


Next, I took some super glue, and glued the loose end down. I used a pin to hold it in place while the glue became tacky enough to hold it on its own.


Once the glue was dry enough for me to handle, I added jelly crystals and salt - five different colours - and then superglued the lids on (mainly because I don't know what jelly crystals or salt do to the nice suede soles of dance shoes, and didn't want to test the theory that it was bad for them).

And, with that, I had five vials of 'poison' to complete my outfit.


Lastly, to affix them to my dress, I sewed a row of buttons onto the dress, at the right hip.


Each of the loops fitted nicely onto the buttons.


Perfect! Murderess outfit completed. And, a day before it needed to be worn.

Sunday, October 24, 2010

White raglan sleeve shrug

This is a really, really, quick item to make.

On my drive home from the TEDx conference I went to the day of STOMP, the charity dance event my big project is for, I realised that a) it was colder than I had been expecting for late October; b) I didn't have anything that would go with my dress to cover my arms with, and c) it was almost 6pm on a Saturday night so all the shops were closed.

I remembered that I had seen a refashion of the sleeves of a raglan sweater into a shrug. (I just went searching, and the original blog post I read is here. The original instructions are for a knitted item, rather than for knit fabric.) Lacking any raglan sleeves, I raided my pattern stash for any patterns with raglan sleeves, so that I could make some from scratch.

And, as luck would have it, I came across this pattern, that I bought at an op-shop (thrift store) a fortnight ago. I must have sensed that I would need it. Or, perhaps (more likely), I bought a bunch of patterns 'that might be useful one day, and it's for charity, and they're only 50c.' It's Knitwit 1150, and It has a copyright date of 1979.


So, I took the pattern out, traced around the sleeve, size 6, and cut out two sleeves. I used white stretch lycra that was in my stash, but in all honesty, I have no idea what I ever sewed with stretch lycra in the past. It was clearly used though, because it had that weird 'I've-had-patterns-cut-out-of-me-so-I'm-not-a-straight-line' edge thing going on. 


Next, I bound the edges of the sleeves (the bits that would be sitting on my back) with baby pink bias binding from my stash. I think the binding was originally used to finish off a corset I made many years ago.


Again, I remembered a tutorial I had read about sewing on bias binding, available here, found through craftgossip. I have, in the past used bias binding, but until I read the post, I must admit, I'd mostly forgotten how. 

Once the sleeves were bound, I added some lace from the leftovers from my Stomp dress to the ends of the sleeves. Partly because the shrug was aimed to go with the Stomp dress, partly because I had a feeling that the sleeves were going to be too short without the extra length of the lace (I like my sleeves to sit on my wrist or low on my palms), partly because I had run out of bias binding, and mostly because I was feeling lazy, and didn't want to hem them properly.

Because I was running a bit behind schedule at this point, I forgot to take a photo of the lace. Sorry.

Lastly, I sewed the seams closed. I used a 1.5 stitch length, and a 1.5 stitch width for the zig zag stitch. So that I didn't pull the seams as I sewed them, I pinned them to a piece of tissue paper. 


Lastly, I tried the sleeves on my dress form, and decided that I just had to sew the ends of the arms closed at the ends, to join the two pieces and finish my shrug. Again, no photos. The tissue paper then tore away like the perforations on a stamp.

And, with that, I had a raglan sleeve shrug that had taken me less than an hour to make, and only used items from my stash. 

Plus, it looked awesome with my dress.


Monday, October 18, 2010

Teaser - my next project

So, I know it's been a while since I really posted anything here, so I'll just post a teaser.


I'm working on a dress inspired by a clothing company known as gibbous, and other gibbous inspired items.