Friday, October 29, 2010

Fabric Flower Texture


Now, I have to preface this by saying the finished texture really doesn't look like flowers. Not really. But, it is a useful reference point to describe the technique I used to create this texture.

I used this texture as part of my most recent project, the Stomp dress.

These flowers are really really easy to make, but time consuming.

I think that I got the idea and basis of this technique from this wreath tutorial here, which I origianally found through craftgossip here.

Okay, so what I did.

Firstly, I cut a bunch of basically circular shapes - or roundish shapes - from a variety of fabrics.

As you can see, they aren't perfect circles.


Then, take a circle. Fold it in half, then in thirds.


Put five or six stitches into the overlapping edge, near the point.


Congratulations, you have created the first of your flowers.


As you sew, you end up with a cool looking pile of flowers.


Now, you have to sew them to your dress (or top, or bag, or whatever it is you are covering with the texture).

Each of the flowers need to be attached individually. Sounds easy right? Well, it is, it just takes a while.

Starting at the top edge, take a flower. I sewed them  on along basically straight lines. Each flower only needs a single stitch to stay in place. The stitch should be placed near the tip - most of mine were 5-8mm from the point. I worked from right to left, placing each flower about 5mm from the previous one, and each row about 5mm from the last.

Build up, row by row.


Monday, October 25, 2010

Veil

The last thing that I needed to complete my Stomp costume was a veil - to complete the murderess bride look.

After a quick search of the interwoobs, I found the ehow tutorial for a veil here, and decided that it sounded easy. And you know what? It was

I'm not going to repeat their instructions here, because they are already available. I will, however, post my pictures.

The veil was incredibly easy to make. I used curtain elastic rather than bridal tulle, and was really pleased with the result.

So, I cut a rectangle of curtain lace (mine was 213cm long), and folded it in quarters.

I cut a curve along the not folded edge.


Next, I bound the edges with silver bias binding. I used a clear thread and a wide, short zig zag stitch.


Lastly, I folded the veil unevenly in half, so that one edge was longer than the other (and, I forgot to take photos - bad blogger that I am). I sewed a really long hand stitch along the fold line, and gathered it to the length of the comb I was attaching it to. I finished the edges off, and then hot glue gunned it into place.


Miniature poison bottles

Again, this is part of my Stomp costume.

As I had decided to go as a murderess, I needed my methods. I found a dagger-like letter opener, which I wore under my dress, held in place with garter elastic.

But, as this was under my dress, it wasn't particularly obvious. So, I added the more obvious element of small vials of poison.


These were super easy to make. The hardest part was finding the vials to begin with. In the end I picked them up in my local bead shop for 10c each. A huge thanks to the kind lady at bead street who sold them to me - they turned out to be perfect.

The vials had price stickers on them, which were easily cleaned using Eucalyptus Oil.


Once clean, I took thin cord, the same as I used to lace up the dress and on one of the straps, and made the hangings.

To do this, I firstly made a loop about half the length of the vial.


Then, I turned the end back, towards the top of the vial.


Next, about half way along the loop, I started to wrap the cord around the vial.


I wrapped a total of 4 times for most of the vials, and then cut the end off about 2mm past the original loop.


Next, I took some super glue, and glued the loose end down. I used a pin to hold it in place while the glue became tacky enough to hold it on its own.


Once the glue was dry enough for me to handle, I added jelly crystals and salt - five different colours - and then superglued the lids on (mainly because I don't know what jelly crystals or salt do to the nice suede soles of dance shoes, and didn't want to test the theory that it was bad for them).

And, with that, I had five vials of 'poison' to complete my outfit.


Lastly, to affix them to my dress, I sewed a row of buttons onto the dress, at the right hip.


Each of the loops fitted nicely onto the buttons.


Perfect! Murderess outfit completed. And, a day before it needed to be worn.

Sunday, October 24, 2010

White raglan sleeve shrug

This is a really, really, quick item to make.

On my drive home from the TEDx conference I went to the day of STOMP, the charity dance event my big project is for, I realised that a) it was colder than I had been expecting for late October; b) I didn't have anything that would go with my dress to cover my arms with, and c) it was almost 6pm on a Saturday night so all the shops were closed.

I remembered that I had seen a refashion of the sleeves of a raglan sweater into a shrug. (I just went searching, and the original blog post I read is here. The original instructions are for a knitted item, rather than for knit fabric.) Lacking any raglan sleeves, I raided my pattern stash for any patterns with raglan sleeves, so that I could make some from scratch.

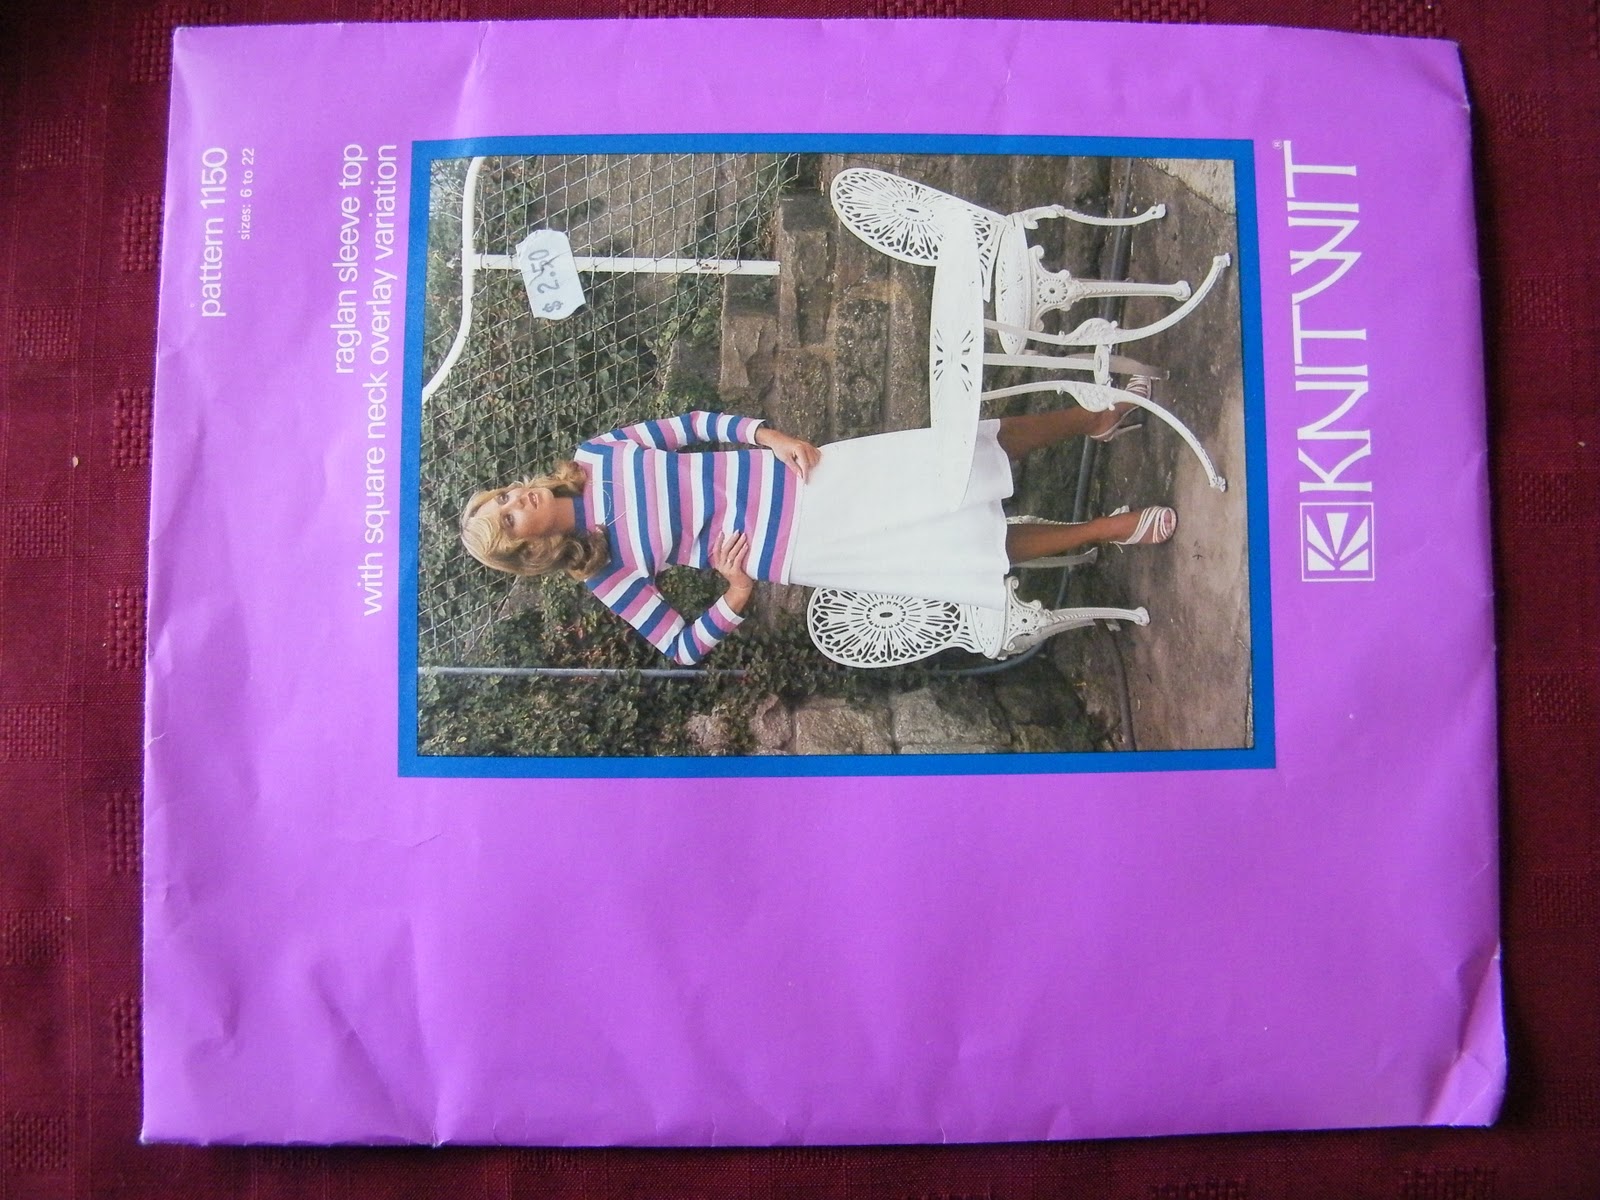
And, as luck would have it, I came across this pattern, that I bought at an op-shop (thrift store) a fortnight ago. I must have sensed that I would need it. Or, perhaps (more likely), I bought a bunch of patterns 'that might be useful one day, and it's for charity, and they're only 50c.' It's Knitwit 1150, and It has a copyright date of 1979.


So, I took the pattern out, traced around the sleeve, size 6, and cut out two sleeves. I used white stretch lycra that was in my stash, but in all honesty, I have no idea what I ever sewed with stretch lycra in the past. It was clearly used though, because it had that weird 'I've-had-patterns-cut-out-of-me-so-I'm-not-a-straight-line' edge thing going on. 


Next, I bound the edges of the sleeves (the bits that would be sitting on my back) with baby pink bias binding from my stash. I think the binding was originally used to finish off a corset I made many years ago.


Again, I remembered a tutorial I had read about sewing on bias binding, available here, found through craftgossip. I have, in the past used bias binding, but until I read the post, I must admit, I'd mostly forgotten how. 

Once the sleeves were bound, I added some lace from the leftovers from my Stomp dress to the ends of the sleeves. Partly because the shrug was aimed to go with the Stomp dress, partly because I had a feeling that the sleeves were going to be too short without the extra length of the lace (I like my sleeves to sit on my wrist or low on my palms), partly because I had run out of bias binding, and mostly because I was feeling lazy, and didn't want to hem them properly.

Because I was running a bit behind schedule at this point, I forgot to take a photo of the lace. Sorry.

Lastly, I sewed the seams closed. I used a 1.5 stitch length, and a 1.5 stitch width for the zig zag stitch. So that I didn't pull the seams as I sewed them, I pinned them to a piece of tissue paper. 


Lastly, I tried the sleeves on my dress form, and decided that I just had to sew the ends of the arms closed at the ends, to join the two pieces and finish my shrug. Again, no photos. The tissue paper then tore away like the perforations on a stamp.

And, with that, I had a raglan sleeve shrug that had taken me less than an hour to make, and only used items from my stash. 

Plus, it looked awesome with my dress.


Monday, October 18, 2010

Teaser - my next project

So, I know it's been a while since I really posted anything here, so I'll just post a teaser.


I'm working on a dress inspired by a clothing company known as gibbous, and other gibbous inspired items.

Tuesday, October 12, 2010

Sewing Basket Challenge - Ribbon Back Dress

Hey. Hope you're all having a great day.

As refashions go, this one was pretty easy.

I had sewn this dress years ago, back when my waist was a few cm smaller. I know that doesn't seem like a big difference, and for most items of clothing, honestly, it isn't. But for this dress, it made it unwearable.

To allow for the lacing up the back, the dress has an overlapping panel at the centre back. I had originally secured this with a hook and eye closure on each side. But the closure is now far too tight form me to comfortably wear it.

So, I took out the hook and eye closure, and replaced it was pairs of ribbons to tie. One on the inside, and three on the outside. The ribbons give me so much more flexibility in how tightly it sits at the waist, and now it is totally wearable again!


The other thing that needed to be done to finish the dress was to hem the bottom. A lot of my clothes end up unhemmed because I get bored. So, with a hem the dress is finished.

Dress front. Respectable looking.

Dress back. The ribbon is designed to be a surprise after the demure front.
I am wearing a tube top under the dress, because I don't like the look of a visible bra under the lacing, and I'm not comfortable without one.